


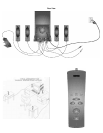


Stereo x2 Setup:
1. Connect the orange plug from the RIGHT FRONT Satellite into the jack
marked RIGHT FRONT on the Subwoofer; repeat this procedure for the LEFT
FRONT Satellite, connecting the brown plug from the LEFT FRONT Satellite
to the jack marked LEFT FRONT on the Subwoofer.
2. Connect the purple plug from the RIGHT REAR Satellite into the jack
marked RIGHT REAR on the Subwoofer, repeat this procedure for the LEFT
REAR Satellite, connecting the gold plug from the LEFT REAR Satellite to the
jack marked LEFT REAR on the Subwoofer.
3. Connect the gray DIN plug from the System Controller unit into the DIN
jack marked CONTROLLER on the Subwoofer. Note that the DIN plug has
an arrow. The arrow should be face up for correct insertion into the DIN jack
on the Subwoofer.
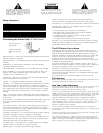
4. Select the 6.5 ft (5m) cable with lime green 3.5 mm stereo plugs on each
end and connect one end into the jack labeled FRONT on the Subwoofer and
the other to the 3.5 mm output jack on your audio source (CD Player, stereo
cassette player, computer sound card, etc.).
5. Optional: Connect a second audio source to the Auxiliary Input at the back
of the Subwoofer. See How To Enhance Presentations With Dialogue and
Other Uses For The (Aux) Auxiliary Input below.
6. Connect the power cord (at back of Subwoofer) to an AC Wall socket.
7. The unit is now ready to operate. Turn on the audio source device.
Note: Always turn on your audio source device before turning on your Altec
Lansing 4100 Speaker System. If you turn on the speaker system before
turning on the audio source, you will hear a loud POP sound when the audio
device is turned on.
8. Turn on the Altec Lansing 4100 Speaker System. See USE OF
CONTROLS below.
Front Input and (Aux) Auxiliary Input
Both Inputs are equal. The Aux (Auxiliary) Input is located on the rear of the
Subwoofer. One Input can be used for the computer output and the other as
described in "How to Enhance Presentations with Dialogue." Make
connections as described above (CONNECTIONS). Do not insert the AC
power plug into the wall outlet before all connections are made.
Headphones
Connect your headphones to the jack on the System Controller. When
headphones are connected, all speakers are muted.
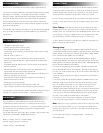
USE OF CONTROLS
Power On/Off
The Power On/Off button is located on the System Controller. Press the
Power button to turn on the speaker system. Push it again to turn the unit off.
A green LED power indicator in the LED grouping above the Mode button will
glow to show power is on.
Master Volume Control
Locate the rotary knob on the System Controller. The rotary knob acts as
the Master Volume control and has several functions. It operates as a
Master Volume control for the overall system when no other buttons have
been pushed. It is also used to individually adjust the levels of bass, treble,
and rear sound. If any of these functions is selected and not used for a few
seconds, the control reverts back to becoming a Master Volume control.
Five level indicators around the control show the position of the control. In
the extreme counterclockwise position all LED's are off. As the control is
rotated clockwise the LED's illuminate one at a time until in the maximum
position, when all LED's are glowing.
If one of the function buttons has been depressed (Bass, Treble or Mode),
the rotary knob will adjust the level of the function selected. The green
function indicator associated with the function selected will be illuminated.
See Treble/Bass Selectors below.
Treble/Bass Selectors
The Bass and Treble buttons are located on the System Controller. When
the Bass button is pushed, the bass LED will turn on and the rotary knob will
change the level of bass on all speakers, having the greatest effect on the
subwoofer. The LEDs around the rotary knob will light one at a time to
indicate the level of bass boost or bass reduction. The center LED indicates
the default position. Pushing the bass button again will immediately exit this
function. To reset the bass level to the default position, hold the bass button
down for three seconds.
Pushing the Treble button will result in a similar pattern. When the treble
button is pushed, the treble LED will turn on and the rotary knob will change
the level of treble on all speakers. The LEDs around the rotary knob will light
one at a time to indicate the level of treble boost or reduction. The center
LED indicates the default position. Pushing the treble button again will
immediately exit this function. To reset the treble level to the default position,
hold the treble button down for three seconds.
Mode Selector
The Mode Selector button is located on the System Controller. The Mode
selector changes the operation of the system from one mode to the next:
Stereo x2, and Gaming. Pressing the Mode button cycles through the two
modes. In Stereo x2 mode (system default) the Front Input plays on both the
Front and the Rear Satellites and the Subwoofer. In Gaming mode, the Front
Input plays on the Front Satellites, the Rear Input plays on the Rear
Satellites, and the Subwoofer plays from both the Front and the Rear Inputs.
Rear Volume Level Adjustments
To adjust the volume level of the Rear Satellites, in either the Stereo x2 or
Gaming mode, hold down the Mode button for approximately 3 seconds. The
LED to the left in the LED group around the Master Volume control (rotary
knob) will begin flashing. This indicates the Master Volume control is now
programmed to adjust the level of the Rear speakers. The LEDs around the
rotary knob will light one at a time to indicate the strength of Rear speaker
level. Pushing the Mode button again will immediately exit this function. If
the control is not actively used for a short while, the control reverts back to
Master Volume control function. The default rear speaker level is at the
center LED position.
The rotary knob reverts to Master Volume control function when a period of 3
seconds of inactivity occurs after adjusting the bass, treble, or rear speaker
levels.
System Reset to Factory Default Settings
If the 4100 is turned on, press the Power button to turn it off. To return to
factory default settings, press both the Bass and Treble buttons at the same
time and while holding them down, plug in the 4100. This will reset the bass,
treble, mode, volume and rear volume settings.