


CARE AND MAINTENANCE
Occasional care and maintenance of the unit and the software
are needed to optimize the performance of your unit,
To clean the cabinet
Use a soft and dry cloth,
If the surfaces are extremely dirty, use a soft cloth lightly
moistened with mild detergent solution, Do not use strong
solvents, such as alcohol, benzine or thinner as these could
damage the finish of the unit.
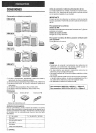
To clean the heads and tape paths
After every 10 hours of use, clean the heads and tape paths
with a head cleaning cassette or cotton swab moistened with
cleaning fluid or denatured alcohol. (These cleaning kits are
commercially available,)
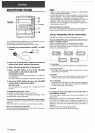
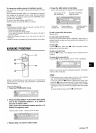
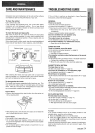
When cleaning with a cotton swab, wipe the recording/playback
head, erasure head (deck 2 only), capstans, and pinchrollers,
~-----’l
1
.
“aybackTdcOt’7bcapstan1
Capstan
I
I
Erasure head
P;chroller
i——————l
/
After cleaning the heads and tape paths with a liquid head
cleaning cassette or a moistened swab, wait until the cleaned
parts are completely dry before inserting the tapes.
To demagnetize the heads
The heads may become magnetized after long-term use. This
may narrow the output range of recorded tapes and increase
noise. After 20 to 30 hours use, demagnetize the heads with
any commercially available demagnetizer,
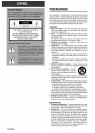
Care of discs
● When a disc becomes dirty, wipe the disc from the center out
with a cleaning cloth.
*
.- f+,,
s~ :,:.1..
.: ,,. .~. .
..
..’
“~
..
... ..
e . : ;“l,.=.’ .: “,
e After playing a disc, store the disc in its case. Do not leave the
disc in places that are hot or humid.
Care of tapes
● Store tapes in their cases after use.
● Do not leave tapes near magnets, motors, television sets, or
any source of magnetism. This will downgrade the sound quality
and cause noise.
● Do not expose tapes to direct sunlight, or leave them in a car
parked in direct sunlight.
TROUBLESHOOTING GUIDE
If the unit fails to perform as described in these Operating
Instructions, check the following guide,
GENERAL
There is no sound.
● Is the AC cord connected properly?
● Is there a bad connection? (-+ page 3)
● There may be a short circuit in the speaker terminals.
+ Disconnect, the AC cord, therl correct the speaker
connections.
● Was an incorrect function button Dressed?
Sound is emitted from one speake!r only.
● Is the other speaker disconnected?
The output sound is not stereo.
c
Is the Karaoke function turned on? (-+ page “19)
An erroneous display or a malfunction occurs.
+
Reset the unit as stated below.
TUNER SECTION
There is constant, wave-like static.
● Is the antenna connected properly? (,+ page 3)
● Is the signal weak?
+ Connect an outdoor antenna.
The reception contains noise interferences or the sound
is distorted.
● Isthe system picking up external noise or multipath distortion?
+ Change the orientation of the antenna.
+ Move the unit awav from other electrical appliances.
CASSETTE DECK SECTIONI
The tape does not run.
● Is deck 2 in pause mode? (~ page 13)
The sound is off-balance or not adequately high.
●
. Is the playback head dirty? (-+ page 24)
Recording is not possible.
● Is the erasure prevention tab on the tape broken off? (+ page
14)
● Is the recording head dirty? (-+ page 24)
Erasure is not [possible.
● Is the erasure head dirty? (+ page 24)
● Is a metal tape being used?
High frequency sound is not emitt(ed.
● Is a tape recorded without Dolby NR played back with the Dolby
NR system operating? (+ page 13)
● Is the recording/playback head dirty? (+ page 24)
CD PLAYER SECTION
The CD player atoes not play.
● Is the disc correctly inserted? (+ page 11)
● Is the disc dirty? (+ page 24)
● Is the lens affected by condensation?
+ Wait approximately one hour and try again.
To reset
If an unusual condition occurs in the display window or the
cassette decks, reset the unit as follows.
1 Press the POWER button to turn off the power.
2 Press the POWER button to turn the power back on while
pressing the ~ CLEAR button. Everything stored in memory
after purchase is canceled.
If the power cannot be turned off in step 1 because of a malfunction,
reset by disconnecting the AC cord, and connect it again. Then
repeat step 2.
ENGLISH 24