


81 En
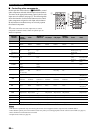
Customizing this unit (MANUAL SETUP)
ADVANCED
OPERATION
English
Use this menu to adjust the optional system parameters.
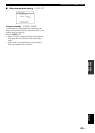
■ Display settings A)DISPLAY SET
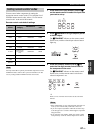
Dimmer DIMMER
Use this feature to adjust the brightness of the front panel
display.
Control range: –
4 to 0
Control step: 1
•Press
D
l to make the front panel display dimmer.
•Press
D
h to make the front panel display brighter.
Video conversion VIDEO CONV.
Use this feature to set whether to convert the video signals
input at the VIDEO, S VIDEO and COMPONENT
VIDEO jacks.
Choices: ON, OFF
• Select “ON” to convert composite, S-video and
component video signals interchangeably.
• Select “OFF” not to convert any signals.
• This unit does not convert 480 line video signals and 576 line
video signals interchangeably.
• The converted video signals are only output at the MONITOR
OUT jacks. When recording a video source, you must make the
same type of video connections between each component.
• When composite video or S-video signals from a VCR are
converted to component video signals, the picture quality may
suffer depending on your VCR.
• Unconventional signals input at the composite video or S-video
jacks cannot be converted or may be output abnormally. In such
cases, set “VIDEO CONV.” to “OFF”.
• When non-standard video signals (such as video signals from a
game console) are input, this unit may not convert the signals
even if you set “VIDEO CONV.” to “ON”.
OSD shift OSD SHIFT
Use this feature to adjust the vertical position of the OSD.
Control range: –5 (upward) to +5 (downward)
Control step: 1
Initial setting: 0
• Press
D
l to raise the position of the OSD.
• Press
D
h to lower the position of the OSD.
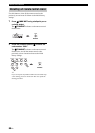
Source feature OSD display time
OSD-SOURCE
Use this feature to set the amount of time to display the
XM Satellite Radio information or iPod menu in the OSD
after you perform a certain operation.
Choices: ON, 10s, 30s
• Select “ON” to display the OSD continuously during
an operation.
• Select “10s” to turn off the OSD 10 seconds after you
perform a certain operation.
• Select “30s” to turn off the OSD 30 seconds after you
perform a certain operation.
Amplifier function OSD display time
OSD-AMP
Use this feature to set the amount of time to display the
status and sound field parameters information screen after
you perform a certain operation.
Choices: ON, 10s, 30s
• Select “ON” to display the OSD constantly during an
operation.
• Select “10s” to turn off the OSD 10 seconds after you
perform a certain operation.
• Select “30s” to turn off the OSD 30 seconds after you
perform a certain operation.
Front panel display scroll FL SCROLL
Use this feature to set whether to display the information
(such as a song title or a channel name) in the front panel
display in a continuous manner or by the first 14
alphanumeric characters after scrolling all characters once
when “XM” or “DOCK” is selected as the input source.
Choices: CONT, ONCE
• Select “CONT” to display the operation status in the
front panel display in a continuous manner.
• Select “ONCE” to display the operation status in the
front panel display by the first 14 alphanumeric
characters after scrolling all characters once.
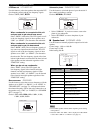
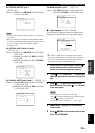
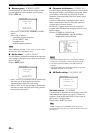
3 OPTION MENU
Notes
MANUAL SETUP
3 OPTION MENU 1/2
p
p
. A)DISPLAY SET
B)MEMORY GUARD
C)AUDIO SELECT
D)PARAM. INI
[ ]/[ ]:Up/Down
[ENTER]:Enter
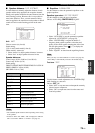
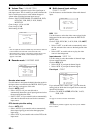
MANUAL SETUP
3 OPTION MENU 2/2
p
p
. E)XMRADIOSET
F)DOCKSET
[ ]/[ ]:Up/Down
[ENTER]:Enter
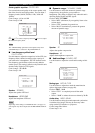
OPTION MENU
A)DISPLAY SET 1/2
. DIMMER;;;;;;;;;0
VIDEO CONV.;;;ON
OSD SHIFT;;;;;;0
[ ]/[ ]:Up/Down
[ ]/[ ]:Select
p
p
[
[
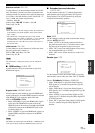
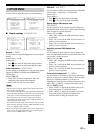
OPTION MENU
A)DISPLAY SET 2/2
. OSD-SOURCE;;;30s
OSD-AMP;;;;;;30s
FL SCROLL;;;CONT
[ ]/[ ]:Up/Down
[ ]/[ ]:Select
p
p
[
[