PREPARATIONS ➤ Connecting a TV En 38
3
Configure the settings for HDMI Control.
a Enable HDMI Control on the TV and playback devices (such as a HDMI
Control-compatible BD/DVD player).
b Turn off the TV’s main power and then turn off the unit and playback devices.
c Turn on the unit and playback devices and then turn on the TV.
d Switch the TV input to display video from the unit.
e Check the following.
On the unit: The input to which the playback device is connected is selected. If not,
select the input source manually.
On the TV: The video from the playback device is displayed.
f Check that the unit is properly synchronized with the TV by turning off the TV or
adjusting the TV volume with the TV remote control.
This completes the necessary settings.
If you select a TV program with the TV remote control, the input source of the unit will be
automatically switched to “AUDIO 1” and the TV audio will be played back on the unit.
• If HDMI Control does not work properly, try turning off and on (or unplugging and then plugging in again)
the devices. It may solve the problem.
• If the unit is not synchronized to the TV’s power operations, check the priority of the audio output setting on
the TV.
• “AUDIO 1” is set as TV audio input at the factory. If you have connected any external device to the AUDIO 1
jacks, use “TV Audio Input” (p.122) in the “Setup” menu to change the TV audio input assignment. To use
the SCENE function (p.61), you also need to change the input assignment for SCENE(TV).
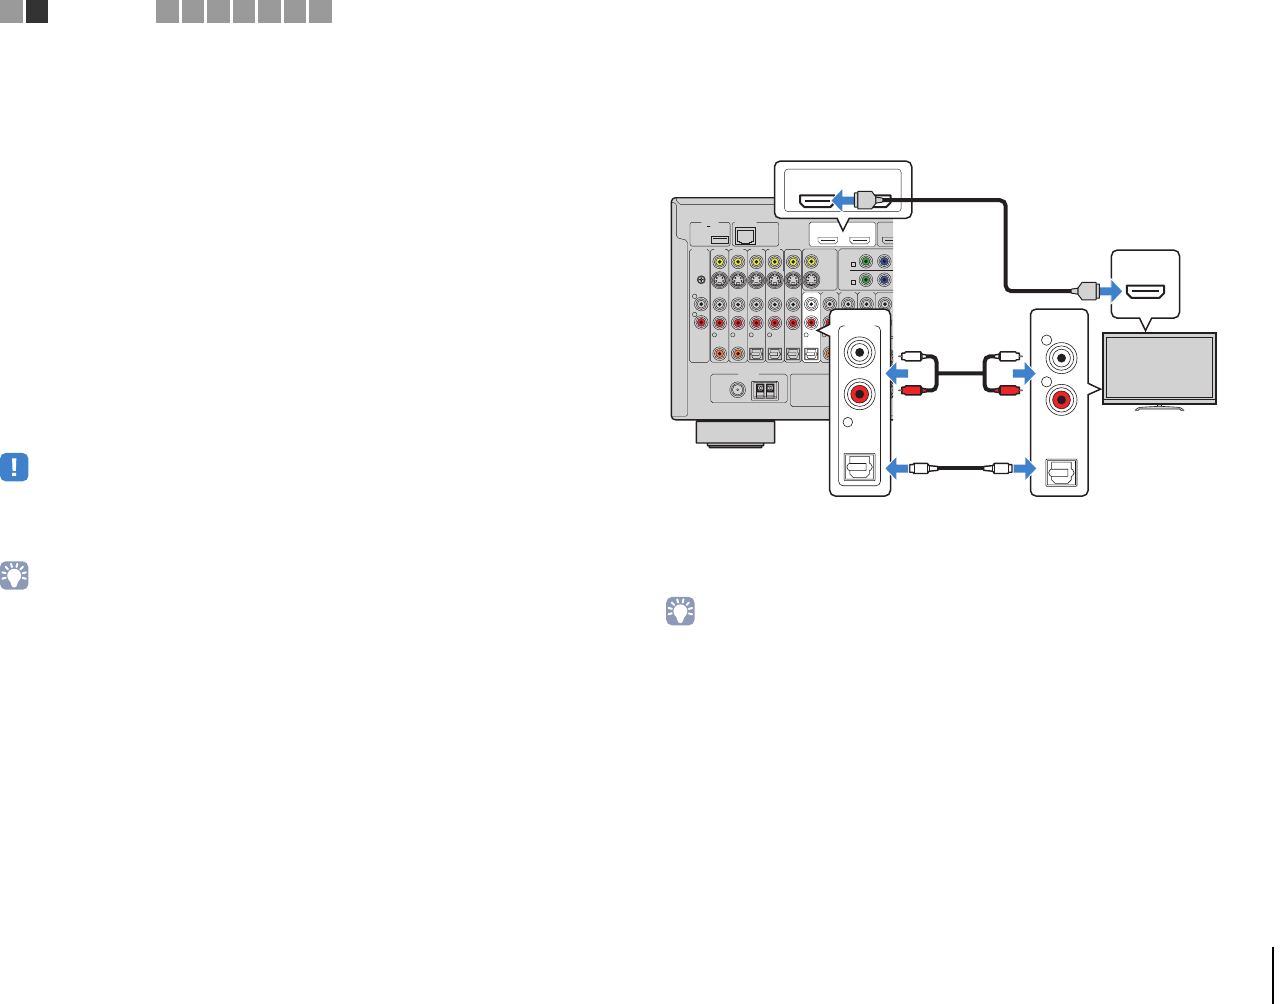
■ Connection Method 3 (TV with HDMI input jacks)
Connect the TV to the unit with an HDMI cable and an audio cable (digital optical or
stereo pin cable).
If you select “AUDIO 1” as the input source by pressing AUDIO 1 or SCENE(TV) on the
remote control, the TV audio will be played back on the unit.
• By connecting a TV to the unit with an HDMI cable, any video input to the unit can be output to the TV,
regardless of the method used to connect the video device to the unit. For details, see “Video signal flow”
(p.156).
• If you have connected any external device to the AUDIO 1 jacks, connect the TV to one of the AUDIO 2–4
jacks. To use the SCENE function (p.61), you also need to change the input assignment for SCENE(TV).
• You can connect another TV or a projector by using the HDMI OUT 2 jack (p.40).
NETWORKDC OUT
5V
0.5A
( 3
NET
)
MONITOR OUT/
ZONE OUT
HDMI OUT
ARC
(ZONE OUT)
12
(1 BD/
AV 1
YPB
AV 1
A
AV 2
B
AV OUT
R
L
AV 3 AV 4AV 2AV 1
(1 BD/DVD)
OPTICAL
4
OPTICAL
3
COAXIAL
2
COAXIAL
1
PHONO
GND
OPTICAL
AUDIO 4AUDIO 3AUDIO 2AUDIO 1
(2 TV)
FRONT
SURROUND
5
COAXIAL
6
R L
FM
75Ω
ANTENNA
HD Radio
AM
(4 RADIO)
HDMI OUT
ARC (ZONE OUT)
12
HDMI
OPTICAL
AUDIO 1
(2 TV)
5
AUDIO
OPTICAL
R
L
HDMI
HDMI
OO
L
R
L
R
The unit (rear)
HDMI OUT 1 jack
AUDIO 1
(OPTICAL or AUDIO) jacks
Audio output
(digital optical or analog stereo)
TV
HDMI input
1 2
TV connection
3 4 5 6 7 8 9


