


4 • Advanced Operations—Sampling
TASCAM CD-302 21
The points marking the start and the end of the sam-
ple must be within 10 seconds of each other, and
must be in the same track.
NOTE
If the scratch function (4.9, “Scratch”) is on, you can-
not use the sampling function.
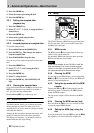
4.3.1 Sampling
1 Make sure the IN and OUT keys U are not lit.
2 Erase any existing sample data (4.3.9, “Clear-
ing the sampled data”).
3 Locate to the location to be used as the start
point of the sample (this can be done “on the
fly” during playback).
4 When you press the
IN key, the current location
is captured as the sample start point. The
OUT
and
SAMPLE keys starts flashing as sampling
starts.
The
SAMPLE key will also flash if the unit is in
playback mode to show that active sampling is
taking place.
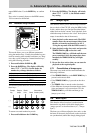
5 Locate the playback position to the location to
be used as the sample end point (or continue
playback until the end point is reached).
6 When you press the
OUT key, the current posi-
tion is captured as the loop point. If the start
and end locations are different, both the
IN and
OUT keys turn on.
NOTE
If ten seconds elapse, or if the end of the track is
reached without you pressing the OUT key, the end
point of the sample will automatically be set at this
point.
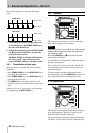
4.3.2 Using the A-B loop as a sample
source
When you have set up an A-B loop (see 3.4.2, “A-B
loop play mode”), you can press and hold the
OUT
key and press the
B key (or the other way round) to
set the A point of the loop as the start point of the
sample, and the B point of the loop as the end point
of the sample (you cannot do this when loop play-
back is taking place).
If the A-B loop is over 10 seconds in length the first
10 seconds will be used as the sample.
4.3.3 Editing the OUT point
You cannot edit the start point of the sample, but it is
possible for you to adjust the end point to a position
within 10 seconds of the start point.
1 With both the
IN and OUT keys lit, “double-
click” (i.e. press twice in quick succession) the
OUT key.
2 The display shows the sampling time from the
start point.
3 Use the dial to adjust the position of the end
point.
4 Press the
OUT key to store the new position of
the end point.
4.3.4 Playback of sampled data
When both the IN and OUT keys are lit, press the IN
key to replay the sampled data.
If you press the
OUT key while the sample is being
played, you will stop the sample playback.
If you press the
IN key while sampled data is played
back, playback restarts from the beginning of the
sampling data.
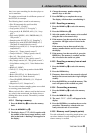
4.3.5 Playback of sampled data in
reverse
1 Press and hold down the SAMPLE key.
2 Press the
IN key. The sample can now be played
back in reverse.
3 Press the
PLAY/PAUSE key to start reversed
playback.
There is also a preset function menu which allows all
samples to be played back in reverse automatically:
1 Press the
PRESET key.
2 Select
05 SAMP/P (
SAMP_P
) using the dial or
numeric keys.
3 Press the
ENTER key.
4 Select
R (reverse) with the dial (the f—for-
ward setting sets forward play).
5 Press the
ENTER key. The REVERSE indicator
will light.
4.3.6 Setting the sampled data
playback tempo
1 Press the PRESET key.
2 Select
07 SAMP/t (
SAMP_T
) using the dial or
numeric keys.