


10
EN
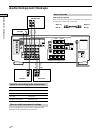
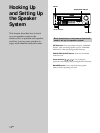
Hooking Up the Components
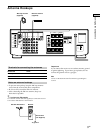
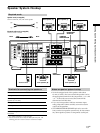
AC OUTLET
*
S-LINK CTRL A1
b
WIRELESS
REAR
SPEAKER
4 Ω 8 Ω
+
+
+–
–
+
–
–
A
R
RL
L
220 V
B
A
B
120 V
240 V
SPEAKERS
FRONT
REAR CENTER
WOOFER
AUDIO
OUT
VIDEO
OUT
VIDEO
IN
VIDEO
OUT
VIDEO
IN
DVD IN
VIDEO
OUT
VIDEO
IN
IN
L
R
RECOUT
SIGNAL
GND
COAXIAL
AM
AUDIO
IN
L
R
AUDIO
OUT
AUDIO
IN
AUDIO
OUT
AUDIO
IN
CTRL A1
y
y
ANTENNA
TAPE
MONITORVIDEO 1VIDEO 2
TV/LD DVD
S-LINK
VIDEO
IN
AUDIO
IN
OPTICAL
IMPEDANCE
SELECTOR
FRONT
VOLTAGE SELECTOR
IN
PHONO
IN
CD
INRECOUT
MD/DAT
FM
75Ω
DIGITAL
TV / LD IN
OPTICAL
MD/DAT IN
OPTICAL
MD/DAT OUT
OPTICAL
DVD IN
COAXIAL
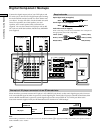
AC OUTLET
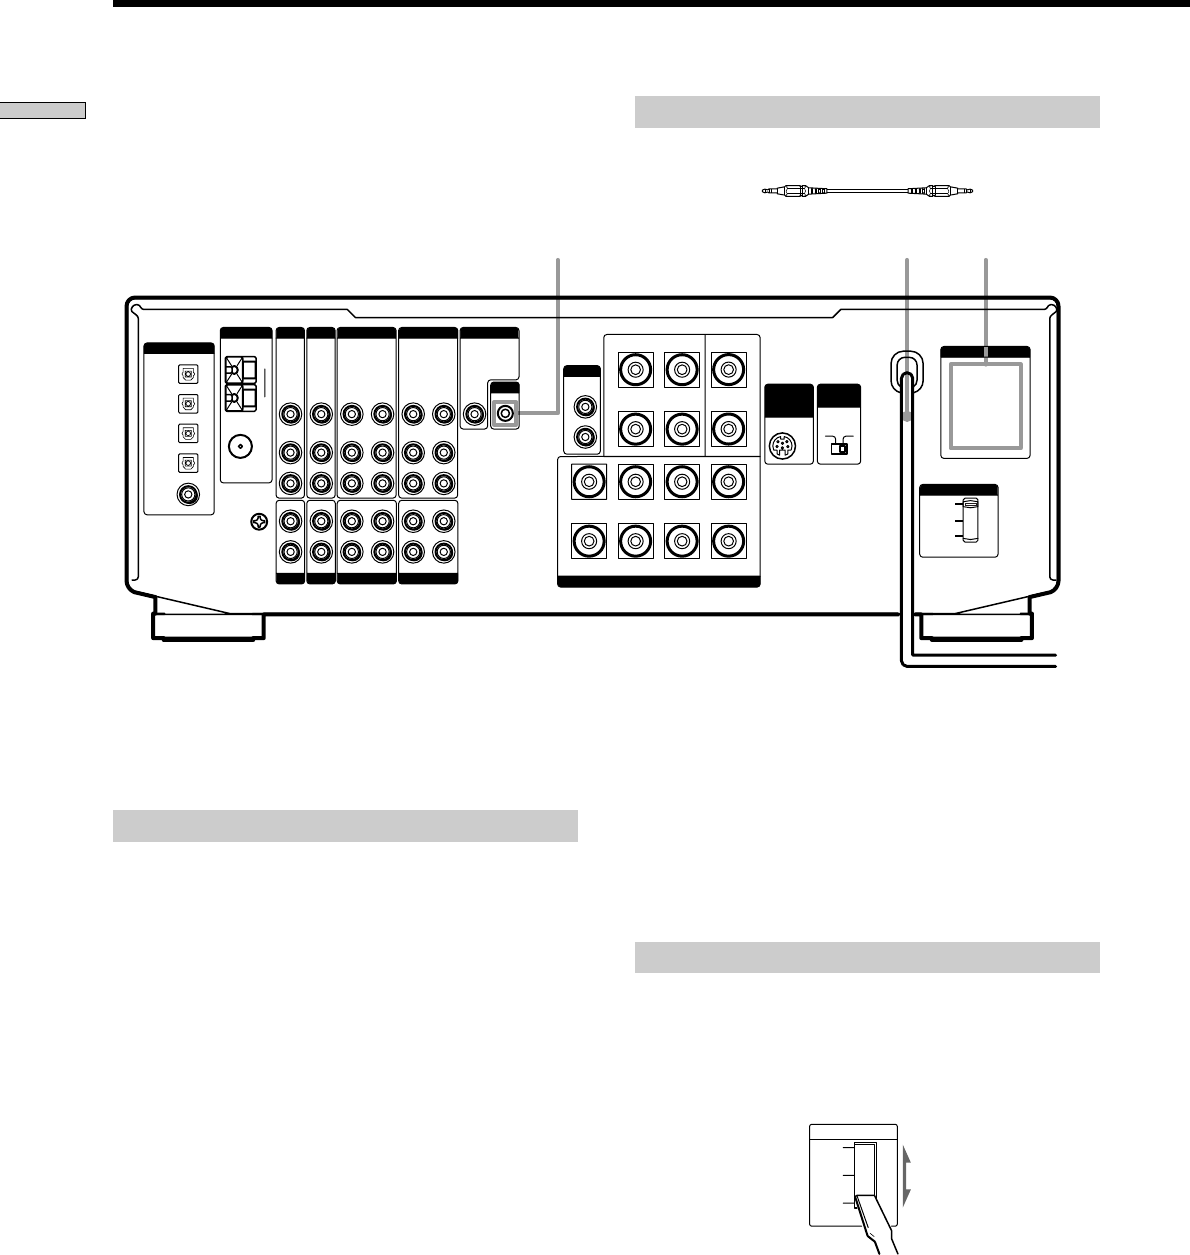
AC power cord
Required cords
CONTROL A1 connecting cord (not supplied)
Black Black
*
The configuration, shape, and number of AC outlets on the rear panel
varies according to the model and country to which the receiver is
shipped.
To a wall outlet
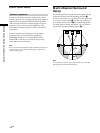
Other Hookups
S-LINK CONTROL A1 hookup
• If you have a S-LINK CONTROL A1-compatible
Sony CD player, tape deck, or MD deck
Use a CONTROL A1 cord (not supplied) to connect the
S-LINK CTRL A1 jack on the CD player, tape deck, or
MD deck to the S-LINK CTRL A1 jack on the receiver.
Refer to the separate manual “CONTROL-A1 Control
System” and the operating instructions supplied with
your CD player, tape deck, or MD deck for details.
Note
If you make CONTROL A1 connections from the receiver to an
MD deck that is also connected to a computer, do not operate
the receiver while using the “Sony MD Editor” software. This
may cause a malfunction.
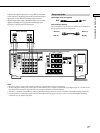
• If you have a Sony CD changer with a
COMMAND MODE selector
If your CD changer’s COMMAND MODE selector can
be set to CD 1, CD 2, or CD 3, be sure to set the
command mode to “CD 1” and connect the changer to
the CD jacks on the receiver.
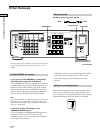
220V
240V
120V
VOLTAGE SELECTOR
If, however, you have a Sony CD changer with VIDEO
OUT jacks, set the command mode to “CD 2” and
connect the changer to the VIDEO 2 jacks on the
receiver.
Setting the voltage selector
Check that the voltage selector on the rear panel of the
receiver is set to the local power supply voltage. If not,
use a screwdriver to set the selector to the correct position
before connecting the AC power cord to a wall outlet.