


– 5 –
SECTION 2
SELF-DIAGNOSTIC
2-1. GENERAL
This set uses the self-diagnostic system in which if an error occurs
in playback/recording mode, the error is detected by the model
control and power control blocks of the microprocessor and infor-
mation on the cause is stored as history in EEPROM.
By viewing this history in test mode, it helps you to analyze a fault
and determine its location.
2-2. TEST MODE SETTING
There are two different methods to set the test mode:
1 Short BP801 (TEST) on the main board with a solder bridge
(connect pin @§ of IC801 to the ground). Then, turn on the
power.
2 In the normal mode, use the keys on the unit to perform the
following operations:
Press and hold down ( and press the keys below in this turn:
+ n + n =n = n + n = n + n
= n P n P
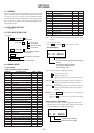
2-3. OPERATION IN TEST MODE SETTING
When the test mode is set, the LCD shows repeated cycles of the
following display:
1) Unit LCD
2) Remote controller LCD
• Holding down P allows the current display to be maintained
while it being depressed.
2-4. RELEASING THE TEST MODE
For test mode set with the method 1:
Turn off the power and open the solder bridge on BP801 on the
main board.
For test mode set with the method 2:
Turn off the power.
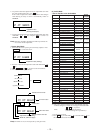
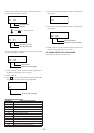
2-5. SELF-DIAGNOSTIC MODE
1. Go into the test mode.
2. With the unit LCD indicators all flashing, press DISPLAY key
to go into the self-diagnostic mode.
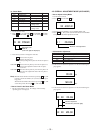
3. Then, each time ) key is pressed, the reference information
display changes as given below.
• Press = key to go back to the previous display.
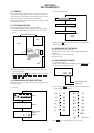
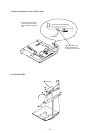
C401
X801
26
25
IC801
IC301
BP801
(TEST)
MAIN BOARD (SIDE B)
All ON
All OFF
Microprocessor
version
display
Vr. 1.00
188:88 pppppp
ı
1st ‚ XX
1st 1 ‚‚
1st 2 ‚‚
1st ‚ XX
N ‚ XX
N 1 ‚‚
N 2 ‚‚
N-1 ‚ XX
N-1 1 ‚‚
N-1 2 ‚‚
N-2 ‚ XX
N-2 1 ‚‚
N-2 2 ‚‚
R XXXX
(return)
888
ı
Vr. 1.‚‚
All ON
All OFF
Microprocessor
version
display
Error indication code
History code
1st0 00