


Editing Recorded MDs
30
EN
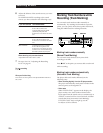
Notes on Editing
You can edit the recorded tracks after recording, using
the following functions:
• Erase function allows you to erase recorded tracks
simply by specifying the corresponding track
number.
• Divide function allows you to divide tracks at
specified points so that you can quickly locate those
points afterwards, using the AMS function.
• Combine function allows you to combine two
consecutive tracks into one.
• Move function allows you to change the order of
tracks by moving a specific track to a track position
you want.
• Title function allows you to create titles for your
recorded MDs and tracks.
Before editing, press MD (or set CD/MD to MD) to
switch the function of the buttons to MD.
If “Protected” appears in the display
The player could not edit because the record-protect slot on
the MD is open. Edit after closing the slot.
When “TOC” flashes in the display
Do not move the unit or pull out the AC power cord. After
editing, “TOC” lights continuously until you eject the MD or
turn off the power. “TOC” flashes while the player is
updating the TOC. When the player finishes updating the
TOC, “TOC” goes off.
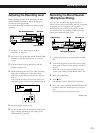
Erasing Recordings
(Erase Function)
There are three methods for erasing recordings:
• Erasing a single track
• Erasing all tracks on an MD
• Erasing a portion of a track
When you erase a track, the total number of tracks on
the MD decreases by one and all tracks following the
erased one are renumbered.
Unlike cassette tapes, there is no need to record over a
previously recorded track in order to erase it.
To avoid confusion when erasing multiple tracks, you
should proceed in order of high to low track number to
prevent the renumbering of tracks that have not been
erased yet.
•
•
•
•
•
•
•
•
•
•
•
•
•
•
•
•
•
•
•
•
•
•
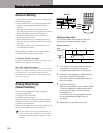
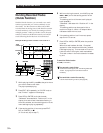
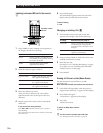
≠ AMS ±
P
p
·
0)
§
EDIT/NO
≠ AMS ±
YES
r
)0
+=
pP·
ERASE
ENTER
CANCEL
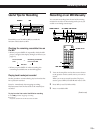
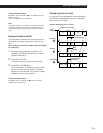
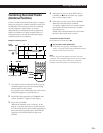
Erasing a single track
You can erase a track and the track title simply by
specifying the corresponding track number.
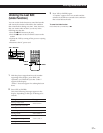
Example: Erasing B
AB C D
AC D
B is erased
Erasing
Track
number
123
4
1
23
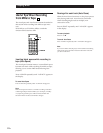
1 Turn AMS until the track number you want to
erase appears in the display (or press the
corresponding number button on the remote).
2 Press EDIT/NO repeatedly (or ERASE once) so
that “Erase ?” appears in the display.
The track number you selected starts flashing in
the music calendar.
3 Press YES (or ENTER).
When the track selected in step 1 has been erased,
“Complete” appears for a few seconds and the
total number of tracks in the music calendar
decreases by one.
If you erase a track during playback, the track
following the deleted one begins playing
afterwards.
4 Repeat steps 1 to 3 to erase more tracks.
Editing Recorded MDs