


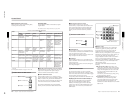
1-8
DFS-700/700P
Chapter 2 Location and Function of
Parts and Controls
2-4
Chapter 2 Location and Function of Parts and Controls
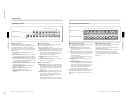
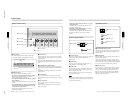
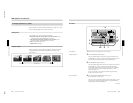
3 Effect transition section
EFFECT
DSK
FTB
SET
TRANS RATE
N/R REV
MIX EFFECT
TITLE
CUT
AUTO
TRANS
2 Display window mode indicators
3 SET button
4 MIX button
7 CUT button
1 TRANS RATE display window
5 EFFECT button
6 TITLE button
8 AUTO TRANS button
9 N/R button
q; REV button
qa Fader lever
qs Fader lever stiffness
adjusting screw
qd Transition indicator
1 TRANS (transition) RATE display window
This shows the transition time for effects, downstream
keys, and fade-to-black, in units of frames. While you
are entering a time, the dot at the lower right of each
numeral lights.
2 Display window mode indicators
These indicate the kind of transition time shown in the
TRANS RATE display window.
EFFECT: Transition time of an effect
DSK: Transition time of a downstream key
FTB: Transition time of a fade-to-black
3 SET button
To set the transition time for an effect, downstream
key, or fade-to-black, press this button, turning it on.
While it is lit, each time you press, the display window
mode indicators change. To set the transition time
corresponding to the display of the display window
mode indicators, enter the value using the pattern/
numeric keypad.
4 MIX button
To carry out the next transition without applying an
effect pattern, but as a mix, press this button, turning it
on.
5 EFFECT button
To carry out the next transition with an effect pattern
applied, press this button, turning it on.
6 TITLE button
To carry out an effect or a mix in title mode, press this
button, turning it on. The title keying is carried out,
inserting the characters and graphics with the effect
pattern and transition settings applied.
7 CUT button
Press this button to carry out an instantaneous
transition.
8 AUTO TRANS (automatic transition) button
Press this button to carry out an effect automatically.
When you press this button, the effect is carried out
automatically, with the transition time which has been
set. During the transition this button is lit. Pressing this
button during the transition pauses it. Press the button
once more to resume the transition.
If you set the fader lever to an intermediate position
and press this button, the transition pauses at the
position corresponding to the fader lever position.
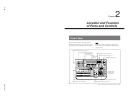
Control Panel
Chapter 2 Location and Function of
Parts and Controls
Chapter 2 Location and Function of Parts and Controls
2-5
9 N/R (normal/reverse) button
To carry out an effect in normal/reverse (i.e.
alternating) mode, press this button, turning it on. It
lights automatically for animation effects and title
keys.
q; REV (reverse) button
To carry out an effect in the reverse direction, press
this button, turning it on.
For an effect for which normal/reverse (alternating)
operation is possible, once the effect is carried out, the
direction is automatically reversed. After an effect is
carried out in the normal (i.e. forward) direction, this
button lights. After an effect is carried out in the
reverse direction, this button goes off.
qa Fader lever
Move this to carry out an effect transition manually.
Note
After powering the system on, move the fader lever to
the end of its travel once in each direction. This
ensures that the fader lever will function correctly.
qs Fader lever stiffness adjusting screw
Turn this screw with a miniature Phillips screwdriver
to adjust the fader lever stiffness. Turn clockwise to
make the fader lever harder to move, and
counterclockwise to make it easier to move.
qd Transition indicator
This indicator consisting of 20 LEDs shows the
progress of an effect transition.
LAST X
INS
RST
SET
PATTERN NUMBER
789
456
123
0
DOWN UP
ENTER
P IN P
DEL
DIRECT
RECALL
DIRECT
PATTERN
PATTERN/KEY PAD
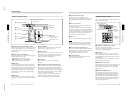
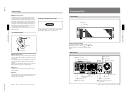
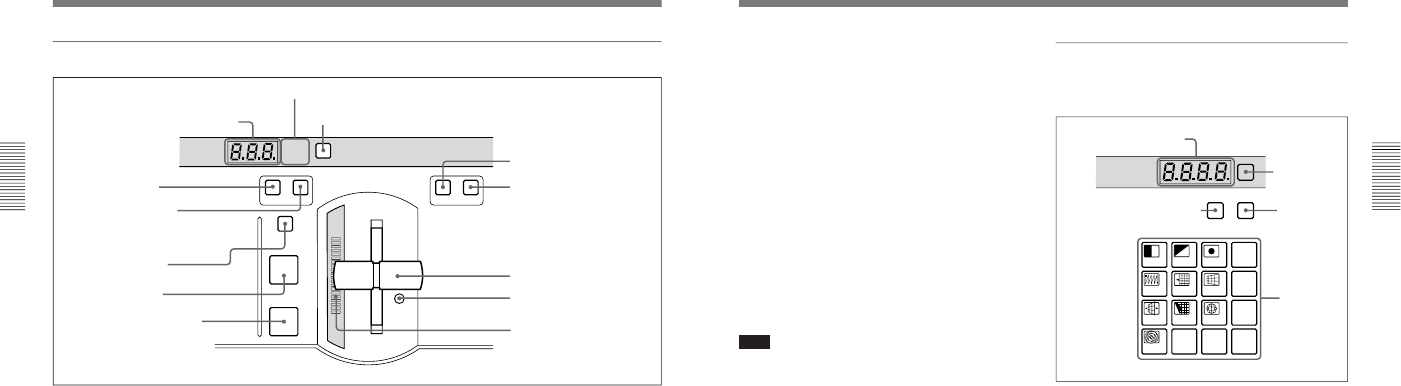
4 Pattern/numeric keypad
This is used for effect pattern selection, transition time
setting, and other data entry.
1 PATTERN NUMBER display window
This shows an effect pattern number.
While you are entering a pattern number, the dot at the
lower right of each numeral lights.
2 SET button
Press this button, turning it on, to enter the pattern
number specification mode. In this mode, you can use
the PATTERN/KEY PAD buttons to specify an effect
pattern number.
Press this button once more, turning it off, to return to
the direct pattern selection mode.
3 DIRECT RECALL button
Press this button, turning it on, to enter the direct recall
mode. In this mode, pressing one of the PATTERN/
KEY PAD buttons 0 to 9 recalls the corresponding
snapshot 0 to 9.
4 DIRECT PATTERN button
Press this button, turning it on, to enter the direct
pattern selection mode. In this mode, you can use the
PATTERN/KEY PAD buttons (0 to 9 and P IN P/
RST) to directly select the assigned effect patterns.
When the system is powered on, and after exiting any
other operating mode, it automatically switches to
direct pattern selection mode.
1 PATTERN NUMBER
display window
3 DIRECT RECALL button
2 SET
button
4 DIRECT
PATTERN
button
5 PATTERN/
KEY PAD
buttons