


17
GB
Getting Started
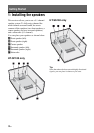
4: Connecting the audio/
video components
This section describes how to hook up your
components to this receiver. Before you begin,
see “Component to be connected” below for
the pages which describe how to connect the
audio/video components.
Before connecting the cords, be sure to
disconnect the AC power cord.
After hooking up all your components,
proceed to “5: Connecting the antennas” (page
21).
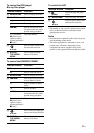
Component to be connected
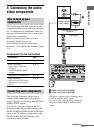
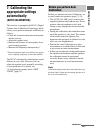
The following illustration shows how to
connect audio components such as Super
Audio CD player or CD player and DIGITAL
MEDIA PORT adapter.
You can also view the images on the TV
screen by connecting the video output of the
DIGITAL MEDIA PORT adapter to the video
input of the TV. However, depending on the
DIGITAL MEDIA PORT adapter, video
output may not be possible.
*The type of connector varies depending on the
DIGITAL MEDIA PORT adapter.
For details, refer to the operating instructions
supplied with the DIGITAL MEDIA PORT
adapter.
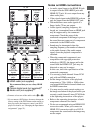
How to hook up your
components
To connect See
TV page 16
Audio components
• Super Audio CD player/
CD player
• DIGITAL MEDIA PORT
adapter
page 17
Components with HDMI jack page 18
Video components
• DVD recorder, DVD player
• Satellite tuner, Set-top box
•VCR
page 20
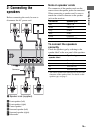
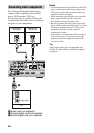
Connecting audio components
AM
ANTENNA
AUTO
CAL MIC
HDMI
BD IN OUTSAT INDVD IN
AUDIO IN
VIDEO 1
VIDEO 2
L
R
L
R
AUDIO IN
SA-CD
/
CD
COAX IN
SAT
OPT IN OPT INAUDIO IN
TV
DIGITAL
TV
DC5V 700mA MAX
DMPORT
Super Audio CD player,
CD player
Audio signal
A
AAudio cord (not supplied)
BVideo cord (not supplied)
B
TV
DIGITAL MEDIA
PORT adapter
continued