


13
Locking Controls and Settings
Use the LOCK feature to prevent accidental or unauthorized changes to the
hardware.
Receiver
Menu path: DEVICE UTILITIES > LOCK
Use the control wheel to select and lock any of the following receiver
functions.
•
MENU: All menu paths are inaccessible
•
GAIN: Gain adjustment is locked
• POWER: Power switch is disabled
•
SCN/SYC: Cannot perform a Scan and Sync
Tip: To unlock, press the
EXIT button, turn the control wheel to select
UNLOCKED, and then press ENTER to save.
Transmitter
Menu path: UTILITY > LOCK
Use the transmitter controls to select and lock any of the following
transmitter functions.
•
MENU LOCK: All menu paths are inaccessible.
• POWER LOCK: Power switch is disabled
Quick-Lock Option: To turn on the transmitter with its power and menu
navigationbuttonslocked,pressandholdthe▲buttonduringpower-onuntil
the locked message is displayed.
Tip: To unlock the MENU LOCK, press the ENTER button 4 times to pass
through the following screens: UTILITY > LOCK > MENU UNLOCK
To unlock the POWER LOCK, set the power switch to the off position, then
pressandholdthe▲buttonwhileresettingthepowerswitchtotheon
position.
Encryption
ULX-D features Advanced Encryption Standard (AES-256) to ensure that
only the receiver that is keyed to the transmitter can monitor the audio
content.
Note: When enabled, encryption is applied to all receiver channels.
Encryption does not affect Dante audio signals, audio quality, or channel
spacing.
1. Enable encryption on the receiver: DEVICE UTILITIES > ENCRYPTION.
The encryption symbol illuminates and the LCD displays SYNC NOW FOR
ENCRYPTION
.
2. Sync the transmitter to the receiver. The encryption symbol displays on
the transmitter.
Note: Any change to the encryption status on the receiver such as enabling/
disabling encryption or requesting a new encryption key, requires a sync
to send the settings to the transmitter.
ENCRYPTION MISMATCH warning
will display on the receiver LCD panel if the transmitter and receiver do not
share the same encryption key.
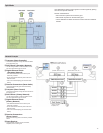
Custom Groups
Use this feature to create and export up to 6 groups of manually selected
frequencies to networked receivers prior to a group scan to simplify system
set up.
Tip: Use Wireless Workbench or Wireless Frequency Finder to select the
best compatible frequencies. See www.shure.com for more information.
To create a custom group:
DEVICE UTILITIES > ADVANCED RF > CUSTOM
GROUPS
> SETUP
Use the control wheel to choose group, channel and frequency values.
Press ENTER to save.
Prior to performing a group scan, export a custom group to networked
receivers:
1. Go to DEVICE UTILITIES > ADVANCED RF > CUSTOM GROUPS > EXPORT
2. Press the flashing ENTER button to export all custom groups to all
receivers on the network.
Note: Use the CLEAR ALL option to remove all custom group settings.
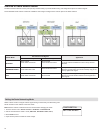
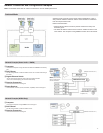
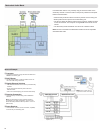
RF Cascade Ports
The receiver has 2 RF cascade ports on the rear panel to share the signal
from the antennas with 1 additional receiver.
Use a shielded coaxial cable to connect the RF cascade ports from the first
receiver to the antenna inputs of the second receiver.
Important! The frequency band must be the same for both receivers.
Antenna Bias
Antenna ports A and B provide a DC bias to power active antennas. Set the
DC power to off when using passive (non-powered) antennas.
To turn bias off:
DEVICE UTILITIES > ADVANCED RF > ANTENNA BIAS > OFF
System Reset
System Reset clears the current receiver settings and restores the factory
default settings.
To restore factory default settings:
1. Go to DEVICE UTILITIES > SYSTEM RESET > RESTORE.
2. Scroll to the DEFAULT SETTINGS option and press ENTER.
3. Press the flashing ENTER button to return the receiver to the default
settings.