


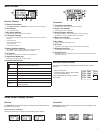


10
Multiple System Setup
A setup using networked receivers is the fastest and easiest way to distribute the best open channel to each system. See Networking ULX-D Receivers for
networking details.
Note: Networked receivers must all be within the same frequency band.
Use this procedure to tune a receiver and transmitter to the best open channel.
Scan and Sync
Important! Before you begin:
Turn off all transmitters for the systems you are setting up. (This prevents
them from interfering with the frequency scan.)
Turn on the following potential sources of interference so they are operating
as they would be during the presentation or performance (the scan will
detect and avoid any interference they generate).
• Other wireless systems or devices
• Computers
• CD players
• Large LED panels
• Effects processors
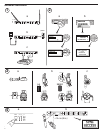
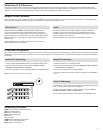
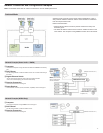
1. Press the SEL button to select a channel.
2. Perform a channel scan on the receiver: SCAN > GROUP SCAN.
3. Press SCAN to start the scan. SCANNING appears on the LCD during the
scan.
4. After the scan completes, the receiver displays the group with the
most available frequencies. Press the flashing ENTER button to deploy
frequencies to each receiver channel.
5. Power on the ULXD transmitter.
6. Press the sync button on the receiver.
7. Align the IR windows until the receiver IR port illuminates red.
8. When complete, SYNC SUCCESS! appears. The transmitter and receiver
are now tuned to the same frequency.
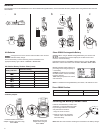
Manual Frequency Selection
To manually adjust group, channel, or frequency:
1. Press SEL to choose a receiver channel and navigate to the RADIO
menu.
2. Use the control wheel to adjust the group, channel, or frequency.
3. Press ENTER to save changes.
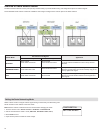
Networked Receivers
1. Turn on all receivers.
2. Conduct a group scan on the first receiver to find available frequencies in
each group: SCAN > GROUP SCAN.
3. Press ENTER to accept the group number and automatically assign the
next best channel to each receiver on the network. The receiver LEDs will
flash when a frequency has been assigned.
4. Turn on a transmitter and sync to the receiver.
Important! Leave the transmitter on and repeat this step for each
additional system.
Non-networked Receivers
1. Turn on all receivers.
2. Conduct a group scan on the first receiver to find available frequencies in
each group: SCAN > SCAN > GROUP SCAN > SCAN
3. When the scan is complete, use the control wheel to scroll through
each group. Press ENTER to select a group that has enough available
frequencies for all channels in the system.
4. Sync a transmitter to each receiver channel.
Important! Leave all transmitters on use the following steps to set up
additional receiver channels:
1. Set each additional receiver channel to the same group as the first
receiver: RADIO > G:
2. Conduct a channel scan to find available frequencies within the group:
SCAN > SCAN > CHANNEL SCAN > SCAN
3. When the scan is complete, press ENTER to assign frequencies to each
receiver channel.
4. Sync a transmitter to each receiver channel.
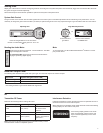
ULXD4Q
Digital Wireless Receiver
push
control
ENTER
EXIT
SCAN
RF
A B
OL
OL
gainaudio
RF
A B
OL
OL
gainaudio
RF
A B
OL
OL
audio
RX1
RX2 RX3
SCAN COMPLETE
G:01 CH:21
485.775 MHz
Rssi: -118 dBm
on
ULXD2
on
ULXD2
2
1
3
4 5
6
7
!
!
!
!
!
!
!
!
!
!
!
!
!
!
!
!
!
!
!
!
!
!
!
!
!
!
!
!
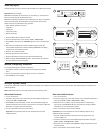
ULXD4Q
Digital Wireless Receiver
push
control
ENTER
EXIT
SCAN
power
RF
AB
OL
OL
gainaudio
RF
AB
OL
OL
gainaudio
RF
AB
OL
OL
gainaudio
RF
AB
OL
OL
gainaudio
RX1 RX2 RX3 RX4
o
n
U
L
X
D
2
<15 cm (8 in.)
RF
A B
OL
OL
gainaudio
RX1
EXIT
SCAN
EXIT
SCAN
SEL
sync
Channel Scan
Group Scan
Group Scan
SCANNING