


32
that there are two pages from which to choose.
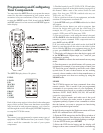
4) Select the PLAY button just above the joystick pad.
The display will show “READY.”
5) Press your DVD remote’s PLAY button. The display
will show “GOOD” if it has been accepted. If it shows
“FAIL,” press PLAY again.
6) Press another button on the Sherbourn remote and
repeat the procedure until all the DVD buttons you need
are learned.
7) Press MAIN once to return to the LEARN mode, twice
for SETUP and three times for the MAIN menu.
8) Try out the Sherbourn remote and see if the learned
buttons will successfully operate your equipment. You may
find that some commands cannot be learned. This may
happen because some commands are too long, too short
or simply not compatible with a learning remote such as
the Sherbourn remote, but this is very rare.
9) The EDIT command can be used to change the labels
if some of the standard labels do not correspond to your
original remote buttons
EDIT
This mode allows you to change the labels in the display
to suit your system. You can change device labels, or the
buttons on page 1 or page 2 of a device, or the FAV labels.
1) In the SETUP menu, press EDIT.
2) To edit a device label, press PAGE and then the device
button. Go to step 5.
3) To edit a button on a device’s page 1 or 2, press the
device button and its page 1 will appear. Press PAGE to
reach page 2 if required. Go to step 5.
4) To edit a FAV button, press FAV and select the button
you want from the five pages. Use PAGE or FAV to change
pages to find the one you want. Go to step 5. (Read about
FAV programming in the subsequent paragraphs)
5) Press the button you want to edit and the first character
will flash.
6) Use the keypad to enter up to 5 characters. This is like
using a telephone keypad to enter letters. For example, if
you press 1 a few times, it will step through A, B, C, 1.
Press 2 for D, E, F and 2. The number 0 has a selection of
special characters from which to choose.
7) Press the JOYSTICK RIGHT to move on to the next
character, or press JOYSTICK DOWN to delete a
character.
8) When finished, press the button next to the label you
just edited. You can edit other buttons, or press MAIN a
few times to return to the main menu.
FAV
This mode allows you to enter your favorite TV and radio
stations. Note that the following procedure assumes you
have already programmed your remote to operate your TV,
radio tuner and other equipment. The keypad must already
be able to select channels on your TV or SAT, and any PT-
7010A tuner presets.
Before using FAV mode, use the EDIT mode to change
the labels in the FAV display to show your station call
signs or reminders. You can also delete the labels from
unused buttons, or move all your most favorite FAV labels
to PAGE 1.
1) In the SETUP mode, select FAV.
2) Select the device, such as SAT, TV or 7010A, to learn
station commands from.
3) The FAV display will appear, and you can step through
five pages using PAGE or FAV.
4) Press a favorite channel button and the first character
will blink. Use the keypad to enter the channel number.
For channels below 10, you should enter a 0 (zero) first. If
you want, you can enter a power button before entering
the channel. Also, if your equipment needs it, you may
have to enter the ENT button after the channel is entered.
If you want to add a short delay, press PAUSE (II). You
can add 0.2 seconds each time you press PAUSE.
5) When you have finished with one channel, press its
button, and the label will reappear. Move on to the next
favorite channel and program it in the same way. Repeat
this for all the channels and devices. Press MAIN to return
to the top menu.
6) Now, if you press the molded FAV button, the favorite
channels appear in the display, and the ones you
programmed will take you to your favorite channel or radio
station. If you programmed in a power command, the TV
or tuner will turn on first.
7) The commands are sent in sequence, for example for
channel 13, first the 1 and then the 3 are sent. Wait a few
seconds before switching between favorites, or your TV
may receive for example, the 1 of one button and the 2 of
the next.
PUNCH
This mode allows you to set up the volume, channel up/
down and transport buttons so they will work for your
main devices, no matter which device the remote is set
for. For example, the volume buttons can operate the TV,
even if the remote is set to VCR. The channel buttons can
operate the VCR, even if the remote is set to TV.
1) In SETUP, select PUNCH and the display changes to
show VOL, CH, and PLAY. The PLAY selection will make
the eight transport buttons around the joystick “punch”
through.
2) Select one of these buttons, for example VOL.
3) Press a device button for the device you want the
Volume commands to appear in (punch TO).
4) Press a device button for the device you want to learn
from (punch FROM). These settings are saved.
5) Repeat steps 2 to 4 until you have punched to all devices
you want.
6) Use MAIN to return to SETUP.