


44
Appendix
Changing or Viewing the Settings
1. When changing driver settings, always make sure to first quit all applications using the V-STUDIO
20 hardware. If you are only verifying the settings you do not need to quit applications.
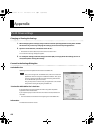
2. Open the “Control Panel,” and double-click “VS-20.”
* If the above icon cannot be found, click the “Switch to Classic View.”
The “VS-20 Driver Settings” dialog box appears.
3. To modify the settings, make the changes and click [OK]. To simply check the settings, be sure to
click [Cancel] after viewing the settings.
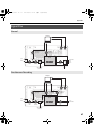
Controls in the Settings Dialog Box
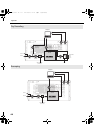
Audio Buffer Size
Ordinarily, set the sixth position from the left for the buffer size.
fig.front01.eps
After you’ve changed the “Audio Buffer Size,” make sure to restart all
applications which are using the V-STUDIO 20 hardware. Then, if you
are using a program that offers a function for testing audio devices,
we recommend that you run such tests.
Also, you may want to check to see if your application is one of those
that provides a setting for adjusting the buffer size.
“Use Smaller ASIO Buffer Size” check box
If this check box is selected, the buffer size when using ASIO-compatible
applications will be made smaller.
If you experience pops or clicks when this check box is selected, deselect this
check box.
* You must deselect this check box when adjusting the “Audio Buffer Size.”
Information
This field shows the driver version.
VS-20 Driver settings
VS-20_e.book 44 ページ 2010年1月18日 月曜日 午前9時8分