If you need any further advice, please call our Technical Helpline on 020 8758 0338 (Mon-Fri)
78
Clock and Alarms .
Setting the alarm clock - cont.
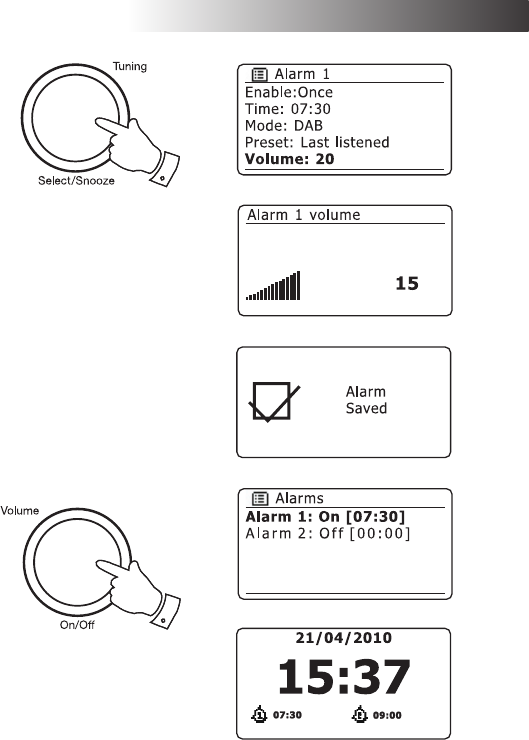
10. Rotate the Tuning/Select control until the 'Volume:' option is highlighted on
the display and press the control if you wish to change it. The radio uses the
saved volume setting for each alarm when it sounds.
Rotate the control to set the required volume and then press the control to
conrm the setting.
11. In order to store the alarm settings rotate the Tuning/Select control until
'Save' is highlighted. Press the control to store the alarm settings. Your radio
will show 'Alarm saved' and will then go back to the list of alarms with the new
alarm setting shown in the display.
If you decide not to save the settings, press the Back button. The display will
show 'Save changes' with a 'YES' or 'NO' option. Rotate the Tuning/Select
control to choose 'NO' and then press the control. 'Alarm not saved' will show
on the display.
Active alarms are shown using small alarm indicators at the bottom of the
playing displays and on the clock display when in stand-by.
Note: If you make a mistake at any point while setting the alarms, use the Back
button to go back to the previous screen.
When the alarm sounds
The radio alarm will sound at the selected times for up to 60 minutes and the
buzzer alarm for 10 minutes unless cancelled. The volume used for the alarm will
be as specied during the alarm setting procedure. If the radio cannot connect to
the specied radio station, the buzzer alarm will be used instead.
To cancel an alarm, press and hold the On/Off control to return to stand-by
mode.
The alarm icon will ash at the bottom of the playing mode displays, and the radio will
automatically switch back to stand-by mode when the 60 minutes have elapsed.
Note: If the radio is switched on because of an alarm you can control basic functions
such as volume. You cannot perform operations which involve the Select control
since this also acts as the Snooze button (see page 79).
10-11


