


Setup and Connections
11
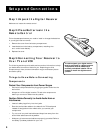
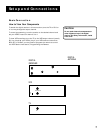
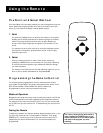
STEP 5: Plug in and Turn on the
System
Plug the end into the wall outlet, matching the wide blade of the plug
with the wide slot in the outlet. Be sure to insert the plug completely.
To turn on the system, press the LOOK button on the remote or the
POWER button on the front panel. If your TV brand is RCA, GE, or
ProScan, press the TV button on the remote to turn on the TV. If your TV
brand is not RCA, GE, or ProScan, see the next section, Using the
Remote, for details on how to use the remote to control your TV.
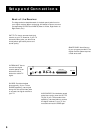
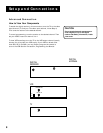
Step 6: Find the Video Input on
Your TV
• Note: You do not need to complete this step if you used the basic
connection.
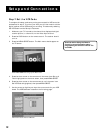
If you used the advanced connection, you must tune your TV to the
Video Input Channel to see the digital receiver menu screens. Since
there are so many brands and models of TVs, there are just as many
ways to access a TV’s Line Input Channel. Below are some things you can
try.
• If your TV brand is RCA, GE, or ProScan, press TV on the remote that
came with your digital receiver. Then press the INPUT button on the
remote.
• If your TV brand is not RCA, GE, or ProScan, consult your TV Owner’s
Manual.
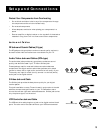
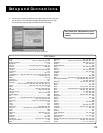
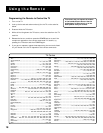
Button/switch
on the TV
VIDEO
SIGNAL
VID 1
VID 2
S-VID
S-VIDEO
Button on the
TV Remote
VID 1
LINE
VID
VIDEO
S-VID
INPUT
SOURCE
AUX
Channel #
00
90
91
92
VID 1
VID 2
If you cannot find your TV Owner’s Manual, you will have to investigate.
You might access the TV’s Video Input Channel by:
• pressing a button on the remote
• finding it through the TV’s menu system
• tuning directly to it by pressing a specific channel number
• going through all channels in the list by pressing the channel up or
down buttons on the TV.
The video channel variations table at the right lists some of the
different ways manufacturers label the Video Input Channel.
Video Channel Variations