Connecting up
02
10
En
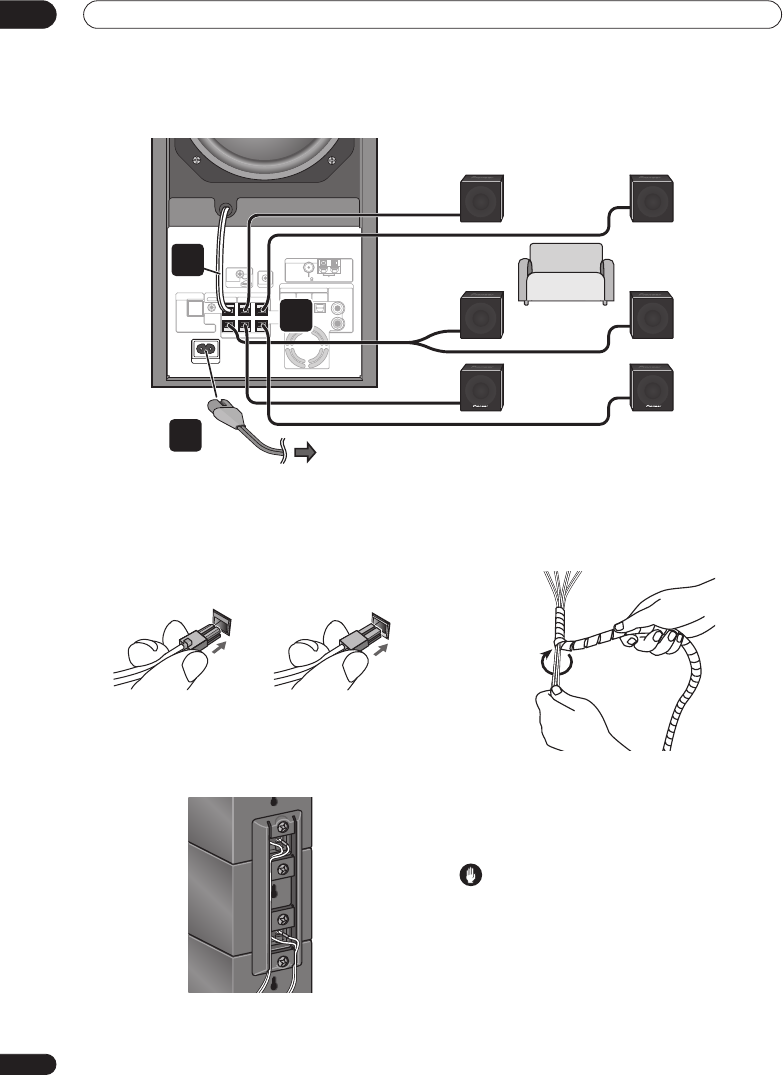
• Connect the other end to the color-coded speaker
terminals on the rear of the receiver subwoofer. Make
sure to insert completely.
The small lug at the wire-end of the speaker plug
should face up or down depending on whether it’s
being plugged into one of the upper or lower speaker
terminals. Please make sure to connect correctly.
• When connections are completed, adjust the cable
placements. If the speakers have been fixed with the
brackets, fix the cable to the groove in the brackets as
shown.
• Fasten the cables together with the spiral wrap.
Hold multiple cables together and place the wrap
over the cables from the end.
Wrap the spiral wrap with the cables in the center.
The spiral wrap may be cut at a desired length.
5 Connect the subwoofer cable.
• Just below the subwoofer speaker, to the left of
center, you should see the subwoofer connecting
cable. Plug this into the
SUBWOOFER SPEAKER
terminal.
Caution
• These speaker terminals carry
HAZARDOUS LIVE
voltage
. To prevent the risk of electric shock when
connecting or disconnecting the speaker cables,
disconnect the power cord before touching any
uninsulated parts.
• Do not connect any speakers other than those
supplied to this system.
SYSTEM CONNECTOR
AC IN
CONTROL IN
USE ONLY WITH DISPLAY UNIT.
SEE INSTRUCTION MANUAL.
CONTROL
OUT
SUBWOOFER
CENTER FRONT
SURROUND
DVD/DVR1
(COAXIAL)
DVD/DVR2
(OPTICAL)
DIGITAL
(OPTICAL)
SPEAKERS
DIGITAL
AUDIO INPUT
ANALOG
AM LOOP ANTENNA
ANTENNA
FM UNBAL 75
RL
RL
R
L
MCACC
SETUP MIC
7
To AC outlet
Y-cable
Receiver subwoofer
5
4
Speaker system
Front right
(Red)
Center
(Green)
Surround right
(Gray)
Front left
(White)
Center
(Green)
Surround left
(Blue)
Listening position
Upper terminal Lower terminal
HTP-330.book 10 ページ 2007年3月27日 火曜日 午後6時8分


