


31
En
Advanced Operation
Using the beat sync function
When beat sync is turned on, the BPM and beat position of tracks played
on this unit can automatically be synchronized with the DJ player con-
nected by PRO DJ LINK that is set as the sync master.
! The beat sync function does not operate for tracks that have not be
analyzed with rekordbox.
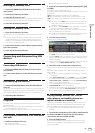
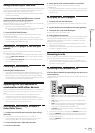
1 Press the [BEAT SYNC MASTER] button on the DJ
player you want to set as the sync master.
Set the DJ player you want to be the sync master.
When the beat sync function is on, the BPM display on the DJ player set
as the sync master changes to orange.
! rekordbox can also be set as the sync master.
= For instructions on setting rekordbox as the sync master, see the
rekordbox (Mac/Windows) operating instructions.
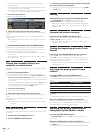
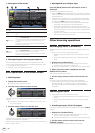
2 Press the [BEAT SYNC] button.
The BPM and beat position of the currently playing track are synchro-
nized to the sync master.
! During synchronization, tempo control with the tempo slider is
disabled and the playing speed display switches to the tempo slider
position’s BPM display, displayed in gray.
Changing the DJ player set as the sync
master
The sync master can be changed to another DJ player connected by
PRO DJ LINK as described below.
! Change or pause the track on the DJ player set as the sync master.
! Press the [BEAT SYNC MASTER] button on the DJ player set as the
sync master.
! Press the [BEAT SYNC MASTER] button on a DJ player other than
the one set as the sync master.
Canceling synchronization
Press the [BEAT SYNC] button.
! If the synchronized playing tempo (BPM) and the slider position’s
tempo (BPM) do not match, the synchronized playing tempo is main-
tained and tempo control with the tempo slider remains disabled.
Normal operation is restored when the position of the tempo slider is
moved to the synchronized playing tempo position.
Operating the CDJ-2000NXS in
combination with other devices
When connected by LAN cable with a Pioneer DJ mixer, such operations
as starting playback on this unit can be controlled with the DJ mixer’s
fader.
! Connect this unit and the Pioneer DJ mixer ahead of time. For
instructions on connections, see Connections on page 12.
! For details on player number settings, see PRO DJ LINK on page 3.
! Also refer to the description of the fader start function included in
the Pioneer DJ mixer’s operating instructions.
Starting playback using a DJ mixer’s
fader (Fader Start)
1 Connect this unit with the Pioneer DJ mixer using a
LAN cable.
For instructions on connecting, see Basic style on page 12.
! If the Pioneer DJ mixer does not have a LAN port, connect a mini
phone plug cable (Ø 3.5 mm) to the CONTROL terminal.
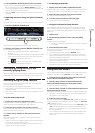
2 Turn on the DJ mixer’s fader start function.
3 Set cues on this unit.
4 Move the DJ mixer’s channel fader or cross fader.
This unit’s pause mode is canceled and the track is played
instantaneously.
! When the channel fader or cross fader is set back to its original posi-
tion, playback cues back to the set cue point and the pause mode is
set (Back Cue).
Relay play on two DJ players
1 Connect this unit and a DJ mixer.
For instructions on connecting, see Connections for relay play on page
15.
2 Set the DJ mixer’s cross fader to the center position.
3 Turn auto cue on for both DJ players.
The DJ players’ auto cue indicators light.
4 Start playback on this unit.
The first track on this unit is played, and once it finished playback begins
automatically on the other DJ player. This unit cues to the beginning
of the next track and pauses. This operation is repeated for relay play
between the two DJ players.
! Relay play may not be possible if the two DJ players are not con-
nected to the same DJ mixer.
! If the power of one DJ player is turned off during playback, playback
may start on the other DJ player.
Browsing tracks
The various devices and the rekordbox library on the connected com-
puter can be browsed to display a list of the tracks.
! When a storage device (SD, USB) on which no rekordbox library
information is stored is browsed, the folders and tracks (music files)
are listed in a layer structure.
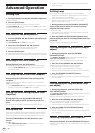
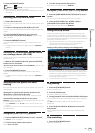
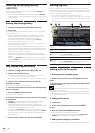
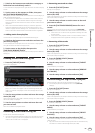
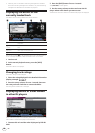
Switching to the browse screen
Press the device button corresponding to the device you
want to display.
When a button is pressed, the contents of the corresponding source are
displayed on a list.
USB
STOP
5 V 1 A
DISC
SD
USB
LINK
rekordbox
BROWSE TAG LIST INFO MENU
TOUCH/BRAKE
VINYL
SPEED ADJUST
OFF
ON
POWER
DISC EJECT
STANDBY
BACK
TAG TRACK
/REMOVE
SD
HOT CUE
QUANTIZE TIME MODE
AUTO CUE
LINK INFO UTILITY
DISC
SD
USB
LINK
rekordbox
! [DISC] button: Displays the contents on the inserted disc.
! [SD] button: Displays the contents on the inserted SD memory
card.
! [USB] button: Displays the contents of the connected USB or
mobile device.
! [LINK] button: Displays the contents on the storage device (SD,
USB) or mobile device on which rekordbox is installed that is
connected to another DJ player by PRO DJ LINK.
! [rekordbox] button: Displays rekordbox connected by PRO DJ
LINK (LINK Export).
! When the browse screen is displayed, the [BROWSE] button lights.
! When the [BROWSE] button is pressed while the browse screen is
displayed, the browse screen closes and the screen returns to the
normal playback screen.
When the [BROWSE] button is pressed again, the previous browse
screen opens.