


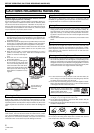


BEFORE OPERATING (PANEL FACILITIES) / AVANT LA MISE EN SERVICE (DESCRIPTION DES ORGANES)
12
<DRB1376>
En/Fr
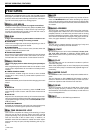
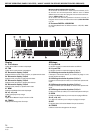
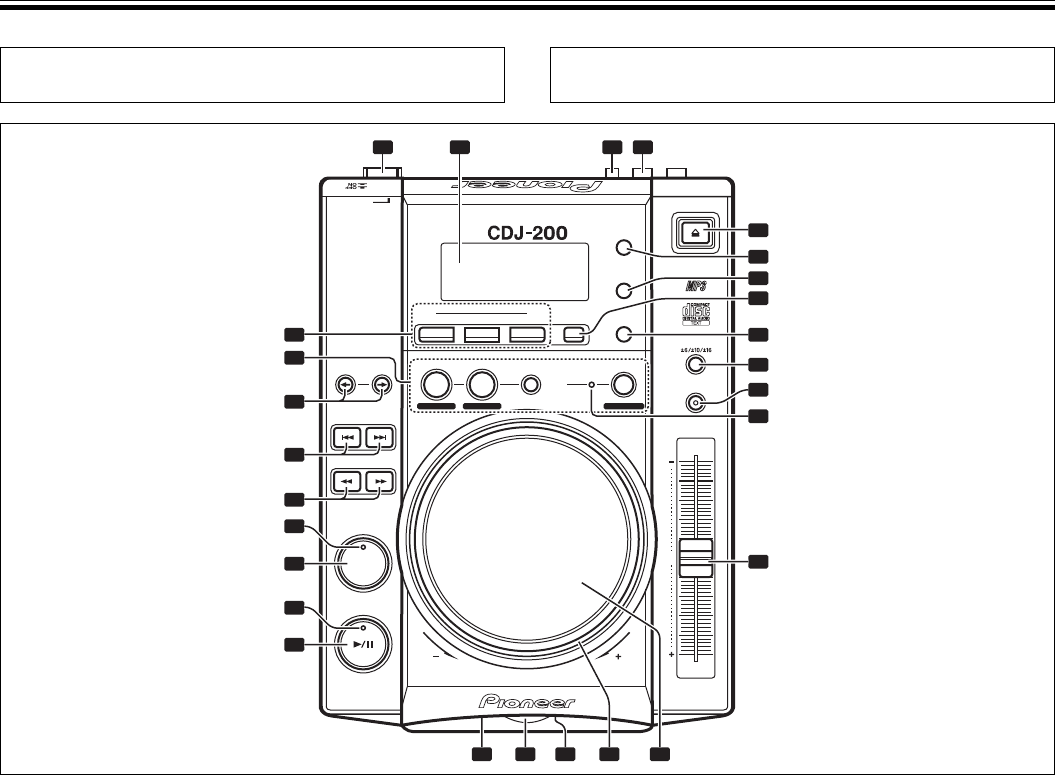
PANEL FACILITIES
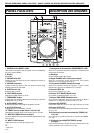
1. POWER switch (—OFF/_ON)
This switch is located on the rear panel of the unit. Switches
the unit’s power ON/OFF.
2. Display
See 31–47.
3. PHONES VOL dial
Located on the rear panel of the unit. Adjusts the volume of
the headphones.
4. PHONES connecter
Located on the rear panel of the unit. ø6.3 mm phone plug
headphones can be connected.
5. EJECT button (0)
Ejects the disc. (☞P.16)
6. TEXT MODE button
Changes the TEXT display. (☞P.15)
7. TIME MODE button
Toggles the time display between the remaining track time
and elapsed time. (☞P.15)
8. HOLD/RESET button
Preserves the effect of the Digital Jog Break. (☞P.23)
9. AUTO CUE button
Toggles the Auto Cue ON/OFF. (☞P.18)
10. TEMPO control range button (±6/±10/±16)
Changes the variable range of the tempo control. (☞P.22)
11. MASTER TEMPO button/indicator
Turns the Master Tempo function ON/OFF (lights when turned
ON). (☞P.22)
12. BEAT LOOP indicator
Lights at the loop-in point during loop play.
EJECT
TEMPO
MASTER TEMPO
0
TEMPO
FWDREV
PLAY/PAUSE
CUE
SEARCH
POWER
TRACK SEARCH
FOLDER SEARCH
COMPACT DISC PLAYER
DIGITAL JOG BREAK
JET ZIP
WAH
HOLD/RESET AUTO CUE
BEAT LOOP
LOOP CUTTEROUT ADJUSTHOT LOOP
RELOOP
/EXIT
OUT
IN/REALTIME CUE
TEXT MODE
TIME MODE
LOOP
1 3 4
5
6
7
8
9
10
11
12
14151718
19
20
21
22
23
24
25
26
27
13
2
16
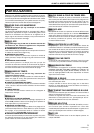
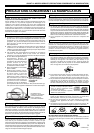
DESCRIPTION DES ORGANES
1. Interrupteur d’alimentation (POWER —OFF/_ON)
Situé sur le panneau arrière de l’appareil, il commande sa
mise sous/hors tension.
2. Affichage
Voir les numéros 31 à 47 ci-après.
3. Bague PHONES VOL (Volume du casque)
Situé sur le panneau arrière de l’appareil, elle permet
d’ajuster le volume sonore du casque.
4. Connecteur PHONES (Casque d’écoute)
Situé sur le panneau arrière de l’appareil, il reçoit la fiche
téléphonique (6,3 mm de diamètre) d’un casque.
5. Bouton EJECT (0)
Pour éjecter le disque. (☞p. 16)
6. Bouton TEXT MODE (Mode texte)
Pour passer à l’affichage TEXT. (☞p. 15)
7. Bouton TIME MODE (Mode horaire)
Pour alterner l’affichage horaire entre la durée de lecture
restante sur la plage et la durée écoulée. (☞p. 15)
8. Bouton HOLD/RESET
Il maintient l’effet de la Coupure par Jog numérique. (☞p. 23)
9. Bouton AUTO CUE
Pour mettre la fonction Repérage automatique en/hors serv-
ice. (☞p. 18)
10. Bouton de portée de commande du TEMPO (±6/
±10/±16)
Pour changer la portée variable de la commande TEMPO.
(☞p. 22)
11. Bouton/voyant MASTER TEMPO (tempo
principal)
Pour mettre la fonction Tempo principal en/hors service (le
voyant s’allume) ou hors service. (☞p. 22)