


DR500 (E-24)
Rev. C 10/94
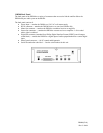
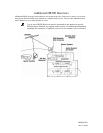
Connecting the DR500 to Your Audio System
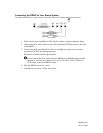
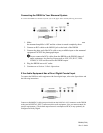
If your DR500 system has not been professionally installed, if you have disconnected your DR500
Receiver, or if you are adding a component, refer to the following steps and diagrams to help you connect
your system.
If you have questions or need assistance connecting any components to your DR500, please contact your
DMX MUSIC Affiliate Sales Support team.
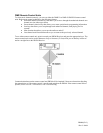
To connect multiple DR500 Receivers to one antenna, refer to Appendix D.
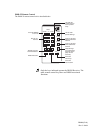
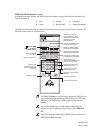
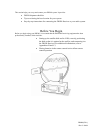
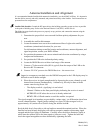
Connection Guidelines
It is important that you follow these guidelines when making any DR500 system connection:
• Do not plug the Receiver into an AC outlet until all connections have
been made and you have read the Startup procedures in Section 3:
Basic Operations.
• Turn the audio system amplifier OFF and the volume completely
down.
• Connections should be finger-tight only; never use pliers or a wrench.
• The DR500 Receiver wall mount power supply is not polarized, and
any orientation on the wall or power strip is acceptable. When
mounting to a standard dual outlet, a screw is provided to prevent
accidental removal of the wall mount power supply.
• The DR500 Receiver should not be plugged into an AC socket like
those found on the rear of audio amplifiers.
• Once the DR500 is connected, turned on, and receiving the satellite
signal, it should remain plugged in to an unswitched (on) AC outlet so
that it can receive any programming updates, authorization commands,
and information from the DMX/DBS National Authorization Control
Center.
If the DR500 will not be used for extended periods of time, it should
be turned off using the front panel power switch only. It should not be
unplugged nor have its AC power turned off.