


3
RQT7972
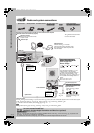
TABLE OF CONTENTS / IMPORTANT SAFETY INSTRUCTIONS
TABLE OF CONTENTS
IMPORTANT SAFETY INSTRUCTIONS . . . . . . . . . . . . . . .3
Discs that can be played . . . . . . . . . . . . . . . . . . . . . . . . .15
Main unit and disc caution. . . . . . . . . . . . . . . . . . . . . . . .15
Convenient functions . . . . . . . . . . . . . . . . . . . . . . . . . . . .18
Disc information. . . . . . . . . . . . . . . . . . . . . . . . . . . . . . . . . . . . 18
Displaying current playback condition (QUICK OSD) . . . . . . . 18
Reviewing titles to play (ADVANCED DISC REVIEW). . . . . . . 18
CD sequential play (CD MODE) . . . . . . . . . . . . . . . . . . . . . . . 18
Quick replay. . . . . . . . . . . . . . . . . . . . . . . . . . . . . . . . . . . . . . . 18
Skipping one minute forward (CM SKIP) . . . . . . . . . . . . . . . . . 18
Changing the zoom ratio . . . . . . . . . . . . . . . . . . . . . . . . . . . . . 19
Changing play speed . . . . . . . . . . . . . . . . . . . . . . . . . . . . . . . . 19
Angle selection and Still picture rotation/advance . . . . . . . . . . 19
Changing soundtracks . . . . . . . . . . . . . . . . . . . . . . . . . . . . . . . 19
Changing subtitles . . . . . . . . . . . . . . . . . . . . . . . . . . . . . . . . . . 19
Repeat play . . . . . . . . . . . . . . . . . . . . . . . . . . . . . . . . . . . . . . . 19
Program/Random play. . . . . . . . . . . . . . . . . . . . . . . . . . . . . . . 20
Using navigation menus . . . . . . . . . . . . . . . . . . . . . . . . 22
Playing data discs. . . . . . . . . . . . . . . . . . . . . . . . . . . . . . . . . . . 22
Playing from the selected track in the CD. . . . . . . . . . . . . . . . . 22
Playing HighMAT
TM
discs . . . . . . . . . . . . . . . . . . . . . . . . . . . . . 23
Playing RAM discs . . . . . . . . . . . . . . . . . . . . . . . . . . . . . . . . . . 23
Using on-screen menus . . . . . . . . . . . . . . . . . . . . . . . . . 24
Main menu . . . . . . . . . . . . . . . . . . . . . . . . . . . . . . . . . . . . . . . . 24
Other Settings. . . . . . . . . . . . . . . . . . . . . . . . . . . . . . . . . . . . . . 24
Changing the player settings. . . . . . . . . . . . . . . . . . . . . 26
Changing the delay time (Speaker Settings) . . . . . . . . . . . . . . 27
The radio . . . . . . . . . . . . . . . . . . . . . . . . . . . . . . . . . . . . . 28
Automatic presetting. . . . . . . . . . . . . . . . . . . . . . . . . . . . . . . . . 28
Selecting the preset channels . . . . . . . . . . . . . . . . . . . . . . . . . 28
Manual tuning . . . . . . . . . . . . . . . . . . . . . . . . . . . . . . . . . . . . . . 28
Optional antenna connections . . . . . . . . . . . . . . . . . . . . . . . . . 29
Sound field and sound quality. . . . . . . . . . . . . . . . . . . . 30
Sound Field Control . . . . . . . . . . . . . . . . . . . . . . . . . . . . . . . . . 30
Super Surround . . . . . . . . . . . . . . . . . . . . . . . . . . . . . . . . . . . . 30
Center Focus . . . . . . . . . . . . . . . . . . . . . . . . . . . . . . . . . . . . . . 30
Dolby Pro Logic II . . . . . . . . . . . . . . . . . . . . . . . . . . . . . . . . . . . 30
Down-mixing. . . . . . . . . . . . . . . . . . . . . . . . . . . . . . . . . . . . . . . 30
Enhancing the bass sound . . . . . . . . . . . . . . . . . . . . . . . . . . . . 30
Subwoofer level . . . . . . . . . . . . . . . . . . . . . . . . . . . . . . . . . . . . 31
Speaker level adjustments . . . . . . . . . . . . . . . . . . . . . . . . . . . . 31
Other useful functions . . . . . . . . . . . . . . . . . . . . . . . . . . 31
Sleep timer . . . . . . . . . . . . . . . . . . . . . . . . . . . . . . . . . . . . . . . . 31
Muting. . . . . . . . . . . . . . . . . . . . . . . . . . . . . . . . . . . . . . . . . . . . 31
Using headphones . . . . . . . . . . . . . . . . . . . . . . . . . . . . . . . . . . 31
Operating other equipment . . . . . . . . . . . . . . . . . . . . . . 32
Operating the television and the video cassette recorder. . . . . 32
Operating the tape deck ([HT930] [HT933] only) . . . . . . . . . . . . . 33
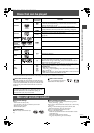
Specifications . . . . . . . . . . . . . . . . . . . . . . . . . . . . . . . . . 33
Troubleshooting guide . . . . . . . . . . . . . . . . . . . . . . . . . . 36
Product Service/Maintenance/Glossary . . . . . . . . . . . . 38
Limited Warranty (ONLY FOR U.S.A.) . . . . . . . . . . . . . . 39
Accessories. . . . . . . . . . . . . . . . . . . . . . . . . . . . Back cover
Read these operating instructions carefully before using the unit. Follow the safety instructions on the unit and the applicable safety instructions
listed below. Keep these operating instructions handy for future reference.
1) Read these instructions.
2) Keep these instructions.
3) Heed all warnings.
4) Follow all instructions.
5) Do not use this apparatus near water.
6) Clean only with dry cloth.
7) Do not block any ventilation openings. Install in accordance with
the manufacturer’s instructions.
8) Do not install near any heat sources such as radiators, heat
registers, stoves, or other apparatus (including amplifiers) that
produce heat.
9) \U.S.A.\ and\Canada]
Do not defeat the safety purpose of the polarized or grounding-
type plug. A polarized plug has two blades with one wider than
the other. A grounding-type plug has two blades and a third
grounding prong. The wide blade or the third prong are
provided for your safety. If the provided plug does not fit into
your outlet, consult an electrician for replacement of the
obsolete outlet.
10) Protect the power cord from being walked on or pinched
particularly at plugs, convenience receptacles, and the point
where they exit from the apparatus.
11) Only use attachments/accessories specified by the
manufacturer.
12) Use only with the cart, stand, tripod, bracket, or
table specified by the manufacturer, or sold with
the apparatus. When a cart is used, use caution
when moving the cart/apparatus combination to
avoid injury from tip-over.
13) Unplug this apparatus during lightning storms or
when unused for long periods of time.
14) Refer all servicing to qualified service personnel. Servicing is
required when the apparatus has been damaged in any way,
such as power-supply cord or plug is damaged, liquid has been
spilled or objects have fallen into the apparatus, the apparatus
has been exposed to rain or moisture, does not operate
normally, or has been dropped.
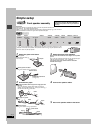
Getting started
Simple setup
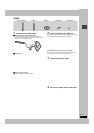
STEP 1
Front speaker assembly . . . . . . . . . . . . . . . . 4
Other speaker setup options . . . . . . . . . . . . . . . . . . .8
STEP 2
Positioning. . . . . . . . . . . . . . . . . . . . . . . . . . . 9
STEP 3
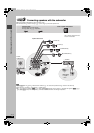
Connecting speakers with the subwoofer
. . 10
STEP 4
Video connections. . . . . . . . . . . . . . . . . . . . 11
STEP 5
Radio and system connections . . . . . . . . . 12
STEP 6
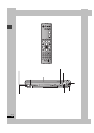
The remote control . . . . . . . . . . . . . . . . . . . 13
STEP 7
QUICK SETUP . . . . . . . . . . . . . . . . . . . . . . . 13
Control reference guide. . . . . . . . . . . . . . . . . . . . . . . 14
Disc operations
Basic play . . . . . . . . . . . . . . . . . . . . . . . . . . . . . . . . . . 16
Using the main unit . . . . . . . . . . . . . . . . . . . . . . . . . . . . . . .16
Using the remote control. . . . . . . . . . . . . . . . . . . . . . . . . . .17
Other operations
Reference
IMPORTANT SAFETY INSTRUCTIONS