


User Guide 7ProFire 2626
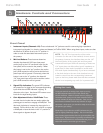
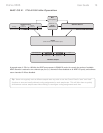
5. Phantom Power Buttons: These two buttons apply
+48V phantom power to XLR inputs 1-4 and 5-8. The top
button activates phantom power on XLR inputs 1 through
4 while the bottom button activates phantom power for
inputs 5 through 8. The LED next to each button will
illuminate when phantom power is being sent to the
associated channels.
6. Headphone Level Knobs: These knobs adjust the
output volume of the headphone outputs. Turn these
knobs clockwise to increase the level of their associated
headphone outputs; turn them counterclockwise to reduce
the output levels.
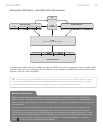
7. Headphone Jacks: Connect headphones to these jacks. The first headphone output is sourced from audio routed
to analog outputs 1/2 while the second headphone output is sourced from audio routed to analog outputs 3/4.
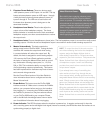
8. Master Volume Knob: This knob controls the
analog output levels of ProFire 2626. Turning the knob
clockwise will increase the output level while turning
it counterclockwise will reduce the output level. By
default, this knob is assigned to control analog outputs
1/2, however, the Control Panel application provides
the option of setting the Master Volume knob to control
any combination of analog output pairs (i.e., 1/2, 3/4,
5/6, or 7/8). This includes the ability to control the level
of all eight analog outputs simultaneously. This feature
has been implemented to facilitate many kinds of stereo
and surround mixing scenarios.
See the Control Panel section of this User Guide for
more information about how to configure and use the
Master Volume knob.
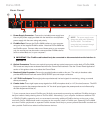
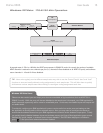
9. Power Button: This button turns the ProFire 2626
interface on and off. Make sure to connect the FireWire
cable to your computer before turning on the interface.
Hot-plugging (i.e., connecting the FireWire cable while
the interface is powered on) may have adverse effects
on your ProFire 2626 and/or your computer. Please
refer to the M-Audio knowledge base at www.m-audio.
com for additional information about hot-plugging.
10. Power Indicator: This LED illuminates when the interface is powered on. It remains continuously lit when the
unit is receiving power and a valid digital clock signal (internal or external); the LED blinks when the interface is not
synchronizing properly to digital clock.
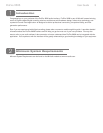
About Phantom Power:
Be mindful when engaging phantom power
since not all microphones require phantom
power to operate. For example, most dynamic
microphones do not require any phantom power
whereas condenser microphones usually do.
Some vintage ribbon microphones may be
damaged if phantom power is applied to them.
Always consult your microphone’s manual
before applying phantom power.
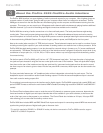
HINT: To control the level of the main monitor
mix without affecting the level at the headphone
outputs, assign the Master Volume knob to
either analog outputs 5/6 or 7/8 and use those
outputs for your main monitors. This prevents the
Master Volume Knob from influencing the levels
of headphone outputs 1 and 2 and effectively
provides front panel volume controls for three
unique stereo outputs.
If you already have a way of controlling the
main monitor mix level (e.g. through the use
of an external mixer), another good use for the
assignable Master Volume Knob is as an auxiliary
send. Simply connect one of the analog output
pairs to an outboard effects unit and assign the
Master Volume Knob to the respective channels.
Bring the outboard effect’s outputs back into the
ProFire 2626 interface using any two available
audio inputs as the auxiliary return and use the
Master Volume Knob to control the auxiliary send
level.