


User Guide 45ProFire 2626
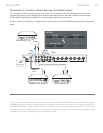
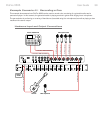
Routing your DAW application outputs:
In this scenario, your audio application will output a mix consisting of six channels. The ProFire 2626 Router
must be correctly configured so that these channels leave the interface through the correct analog outputs. To
make sure all of your outputs are correctly routed, go to the Router tab in the Control Panel:
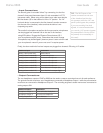
1. Open the drop-down menu under Analog Out 1/2 and select “SW Return 1/2.”
2. Open the drop-down menu under Analog Out 3/4 and select “SW Return 3/4.”
3. Open the drop-down menu under Analog Out 5/6 and select “SW Return 5/6.”
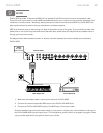
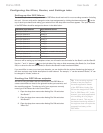
Congure the Master Volume Knob to Control Your Studio Monitors:
Since your studio monitors are connected to analog outputs 1-6, make sure that the “Analog Out 1/2”, “Analog
Out 3/4”, and “Analog Out 5/6” boxes are checked under the “Master Volume Knob” section of the Settings
tab. This will ensure that the Master Volume knob (8) on the front panel can be used to simultaneously raise or
lower the levels of all six speakers.
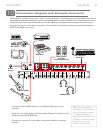
Configuring and Using your DAW to create a Surround Mix
Your audio hardware is now set up for surround mixing. Your surround mix channels are routed correctly through
the interface and the Master Volume knob can be used to control all six speakers simultaneously.
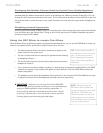
You may need to configure your audio software further before you can begin mixing. For example, you will need
to ensure that your audio application’s left and right channels are being sent to “SW Return 1/2”, the surround left
and surround right channels are sent to “SW Return 3/4”, and the center and subwoofer channels are being routed
to “SW Return 5/6.” This configuration varies from application to application, but it is usually done through your
program’s “Settings” or “Control Panel” menu. Finally, if your DAW offers additional features relating to surround
mixing (i.e., video synchronization and/or playback, bass management, etc.), you may need to set up these features
as well.
Please refer to your application’s user guide to learn how to do this.