


15
ENGLISH
BASIC
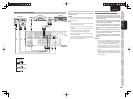
CONNECTIONS
BASIC OPERATION
ADVANCED
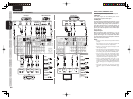
CONNECTIONS
SETUP
ADVANCED
OPERATION
TROUBLESHOOTING
OTHERS
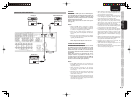
NAMES AND
FUNCTIONS
BASIC OPERATION
BASIC OPERATION
AMP OPERATION
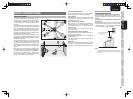
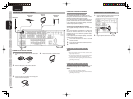
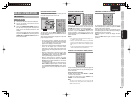
TURNING ON THE UNIT
1.
Connect the AC power cord to the wall outlet.
2.
Turn on the power to the devices that are
connected to the unit.
3.
Press the POWER ON/STANDBY button on
the unit. Each time you press the button, the
power to the unit switches between on and
standby.
To turn on the power with the remote controller,
fi rst press the AMP button and then press the
POWER ON or SOURCE ON/OFF button on
the remote controller.
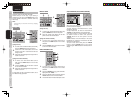
SELECTING AN INPUT SOURCE
Before you can listen to any input media, you must
fi rst select the input source on the unit.
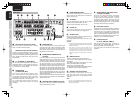
Example : DVD
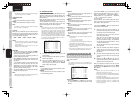
DISPMULTIAUTO TUNE
D
SLEEP
SURR
AUTO
DIRECT
To select DVD, turn the INPUT SOURCE knob on
the front panel or simply press the DVD button on the
remote controller.
After you have selected DVD, simply turn on the DVD
player and play the DVD.
• As the input source is changed, the new input
name will appear momentarily an OSD information
on the video display. The input name will also
appear in the display, on the front-panel.
• As the input is changed, this unit will automatically
switch to the digital input, surround mode,
attenuation, and night mode status which were
entered during the confi guration process for that
source.
• When an audio source is selected, the last video
input used remains routed to the VCR Output
and Monitor Output. This permits simultaneous
viewing and listening to different sources.
• When a Video source is selected, the video
signal for that input will be routed to the Monitor
Output jacks and will be viewable on a TV monitor
connected to the unit.
If a component video input is connected to the
DVD or DSS component inputs, it will be routed
to the Component Video Output. Make certain
that your TV is set to the proper input to view the
signal.
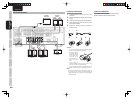
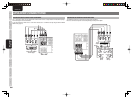
ADJUSTING THE MAIN VOLUME
ANALOG
D
IGITAL
DIGITAL
SURROUND
A
AC
PCM
L
C
R
SLSSR
LFE
Adjust the volume to a comfortable level using
the VOLUME control knob on the front panel or
VOLUME 3 / 4 buttons on the remote controller.
To increase the volume, turn the VOLUME knob
clockwise or press VOLUME 3 button on the
remote controller, to decrease the volume, turn
counterclockwise or press VOLUME 4 button on the
remote controller.
Notes:
• The volume can be adjusted within the range of – ∞
to 18 dB, in steps of 1 dB.
•
However, when the channel level is set as described
on page 22, if the volume for any channel is set at +1
dB or greater, the volume cannot be adjusted up to 18
dB.
(In this case the maximum volume adjustment range is
“18 dB - Maximum value of channel level)
ADJUSTING THE TONE (BASS & TREBLE) CONTROL
During a listening session you may wish to adjust the
Bass and Treble Control to suit your listening tastes
or room acoustics.
(Using the remote controller)
To adjust the bass effect, press BASS + or BASS
– on the remote controller.
To adjust the treble effect, press TREBLE + or
TREBLE – on the remote controller.
Note:
The tone control function can work in the AUTO
Surround, Stereo, Dolby PL
IIx
, DTS, DTS-ES, and
Multi Ch. Stereo mode.
TEMPORARILY TURNING OFF THE SOUND
To temporarily silence all speaker outputs such as
when interrupted by a phone call, press the MUTE
button on the remote controller.
This will interrupt the output to all speakers and the
head-phone jack, but it will not affect any recording or
dubbing that may be in progress.
When the system is muted, the display will show
“MUTE” .
Press the MUTE button again to return to normal
operation.