14
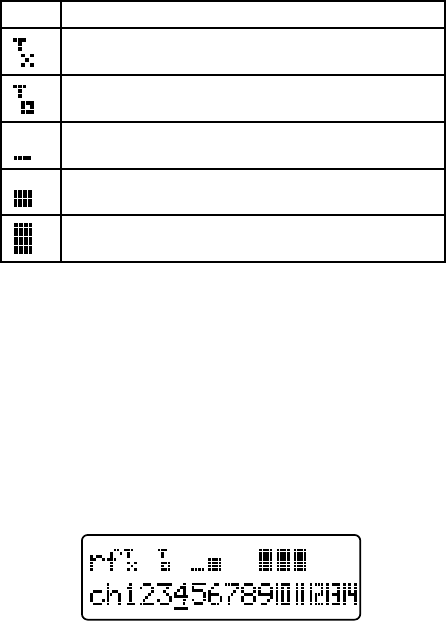
channel scanning PRoceduRe
Though the Line 6 wireless microphone system operates in the unlicensed 2.4 GHz band – above the
frequencies used by most wireless microphone systems, cellular phones, and other voice communication
devices – the band is not unused, and does include WiFi routers. The receiver contains a sophisticated
scanning capability that can determine the existence of interfering wireless devices that would
compromise the performance range of operation on certain channels, and can also help assure that the
selected wireless mic channels do not interfere with other wireless devices. Use the following procedure
to minimize interference; if you are adding new wireless units to a previous installation with Line 6
systems, first turn on the existing transmitters so their frequencies can be detected.
Press the
SETUP button on the receiver. The [SELECT FUNCTION] screen will appear; scroll with
the
ROTARY ENCODER to [CHANNEL SCAN], and press the ROTARY ENCODER to begin the
scanning process. After approximately 6 seconds, the display will show channel numbers 1 through 14
on the bottom line, with a status indicator above each channel. The indicators and their applications
are:
Blank
Little to no RF – best channels to select for use
XD-V70-class transmitter already on and using that channel
(or other Line 6 wireless systems operating in RF1 mode)
XD-V75-class transmitter already on and using that channel
(or other Line 6 wireless systems operating in RF2 mode)
Non-Line 6 low-level RF signal – can use these channels with
minimal effect on range
Non-Line 6 medium-level RF signal – using these channels will
likely result in lessened range for that particular transmitter
Non-Line 6 high-level RF signal – using these channels will
result in a significantly compromised range of operation.
The currently selected channel number for the receiver will be underlined.
Note, No audio will function while the receiver is on this channel-scanning page; you must select a
channel by pressing the
ROTARY ENCODER or press the EXIT button and leave the page to resume
audio.
Turn the
ROTARY ENCODER to scroll through the list of channels; a flashing underline will follow the
channel number as you scroll. Once you have highlighted a blank, unused channel, press the
ROTARY
ENCODER to select it. The receiver display will return to the main page with the new channel number
shown.
Note, Any of the channels can be selected, regardless of the RF conditions displayed for the channel.
Selecting a channel showing significant RF interference can result in lessened range for the associated
transmitter.
Turn on the transmitter you would like to use with the receiver, and use the procedure described in the
Quick Start section to set it to the same channel number. To set up multiple receivers and transmitters,
leave each set on as you scan with the next receiver and select another open channel. Alternately,
after you have performed the scan with the first receiver, note all the open channels with little or no
interference, and set the remaining receiver / transmitter pairs to those channels.


