


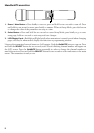


12
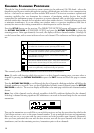
Note, The transmitter can be locked so that the user cannot accidentally or deliberately make changes
to its settings during use. To set the lock, unscrew the bottom section of the transmitter, go to the back
side of the battery compartment, and flip the small micro-switch to the right to lock; the display will
show the image of a lock in the lower left corner, and the word [LOCKED] will appear whenever a
button is pushed. Replace the bottom section to use. To unlock, flip the switch to the left position, and
then changes can be made and the transmitter can be turned off.
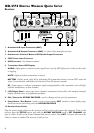
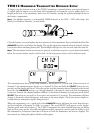
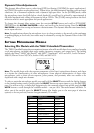
tBP12 BeltPack tRansmitteR detailed setuP
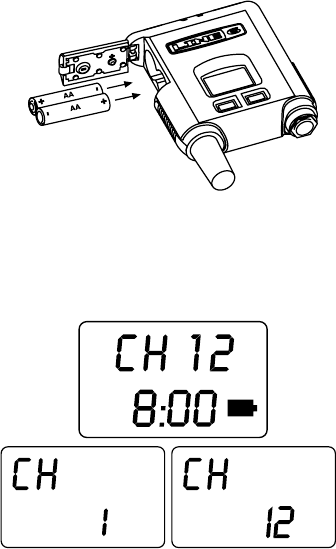
To begin, press the small oval battery lock button on the left side of the transmitter (same side as the
antenna and
OFF/ON slide switch), and slide the rubberized rectangular latch up toward the switch.
The battery door will flip open. Insert two AA batteries, noting the polarity markings on the metal insert
on the inside of the door. Close the battery door and slide the battery latch to the original position.
Slide the
OFF/ON switch to the On position; the display will show the currently selected channel and
remaining battery life.
Note, Use alkaline batteries, or rechargeable NiMH batteries in the 2400 – 2800 mAh range. See
Battery Level Indicator Functions, for more details.
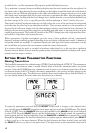
The beltpack transmitter has a TA4M 4-conductor connector for lavalier, headset, and instrument
microphones or a quarter-inch instrument cord to be attached. The microphone must have a TA4F
connector to mate with the beltpack. Align this connector until it slides easily into the beltpack, and
press down until it is seated. To remove, press the button on the side of the TA4F connector and pull
straight out. For more on the application of lavalier and headset mics, see Microphone Usage Tips.
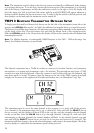
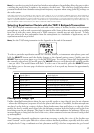
The transmitter must be set to the same channel as the receiver it is to work with (if the receiver
is on channel 9, the transmitter must also be set to channel 9). Press and hold the
SELECT button
for two seconds, and the display will show [CH] on the top line, and the currently selected channel
on the second line. Press the
VALUE button to go through channels 1 through 14, with each click
incrementing to the next channel; the channel number will flash. At the desired channel, stop and
press and hold the
SELECT button for two seconds (or do not press any button for 15 seconds). The
transmitter will then change to the newly selected frequency, and return to the main display. Check the
receiver display to confirm that the transmitter signal is being received.