


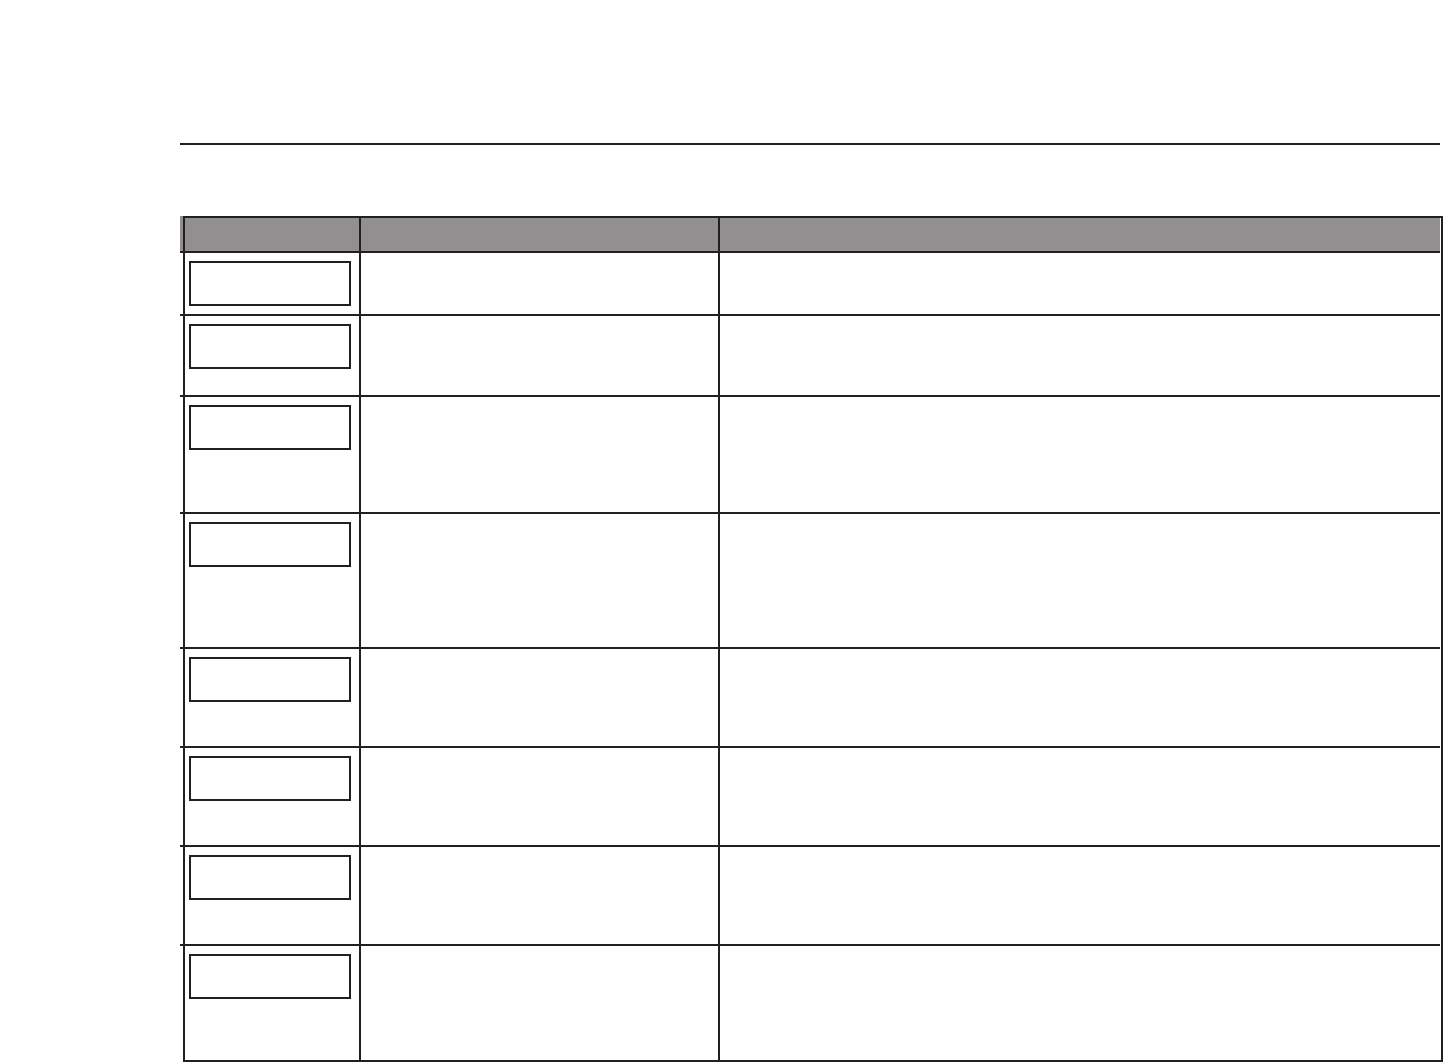
TroubleshootingDescriptionResult
Configuring the MC-12 for V4 EQ
2-19
Version 4 EQ User Guide
The MC-12 calibrated the distance or output
level of the selected loudspeaker without error.
The selected loudspeaker is not present in the
loudspeaker setup according to the CUSTOM
or THX SETUP menu.
The calibrated distance is accurate, but the
microphones detected out-of-phase calibration
noise signals.
The microphones detected calibration noise
signals at unusually low levels.
The microphones did not detect calibration
noise signals, so the MC-12 could not calibrate
the distance of the selected loudspeaker.
At least one of the microphones did not detect
calibration noise signals at reasonable levels. As
a result, the distance calibrated for the selected
loudspeaker may not be accurate.
The microphones detected calibration noise
signals at unusually high levels.
The microphones detected calibration noise
signals at unusually low levels.
N/A
• Use the CUSTOM or THX SETUP menu to add the selected loudspeaker to the loudspeaker
setup. (The MC-12 does not calibrate for loudspeakers that are not present in the loudspeaker
setup.)
• Examine connections between the loudspeaker and the associated amplifier to ensure that
loudspeaker wires are not crossed. If the wiring is correct, the error message can be ignored.
(Some loudspeaker models will report a phase error even if no phase error exists.)
• Dipolar loudspeakers may produce this error. However, the MC-12 does not report the error
unless at least half of the microphones detect out-of-phase calibration noise signals.
• The microphones may be positioned too far from the selected loudspeaker or in a location
where echoes obscure calibration noise signals. Refer to
Repositioning the Microphones for
Automatic Calibration (page 2-10) to ensure that the microphones are properly positioned
for automatic calibration.
• Examine microphone input connections to ensure that the microphones are properly connected
to the MC-12. Make sure microphone cable plugs are fully inserted for solid connections.
• Refer to
Repositioning the Microphones for Automatic Calibration (page 2-10) to
ensure that the microphones are properly positioned for automatic calibration.
•Decrease associated amplifier volume levels, including built-in subwoofer amplifiers.
• The microphones may be positioned too close to the selected loudspeaker. Refer to
Repositioning the Microphones for Automatic Calibration (page 2-10) to ensure that
the microphones are properly positioned for automatic calibration.
• Increase associated amplifier volume levels, including built-in subwoofer amplifiers.
• The microphones may be positioned too far from the selected loudspeaker or in a location where
echoes obscure calibration noise signals. Refer to Repositioning the Microphones for
Automatic Calibration
(page 2-10) to ensure that the microphones are properly positioned
for automatic calibration.
DISTANCES and OUTPUT LEVELS Results
(SPEAKER)
OK
(SPEAKER)
IS NOT ENABLED
(SPEAKER)
OUT OF PHASE
(SPEAKER)
SIGNAL TOO LOW
(SPEAKER)
UNABLE TO CALCULATE
(SPEAKER)
MAY NOT BE ACCURATE
(SPEAKER)
SPKR OUTPUT TOO HIGH
(SPEAKER)
SPKR OUTPUT TOO LOW