


8
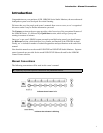
8. Power up your signal source, then press the front panel POWER button on any speaker.
All speakers in the system will power on (the JBL Logo will go from dimly to brightly lit.)
To avoid “thumps” which can damage your speakers, always power up the signal source
FIRST and your LSR4300 monitors LAST.
9. Set the initial speaker volume by pressing the + / - controls on any speaker. All
speakers in the system will go to the designated volume. As the volume is increased,
additional LEDs light. We recommend beginning with a modest volume setting, so that
only the first ten LEDs or so (up to the “-20”) mark are lit.
10. Play a signal source and adjust the final speaker volume to a comfortable listening level by
pressing the + / - controls on any speaker.
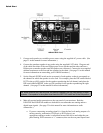
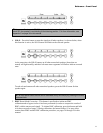
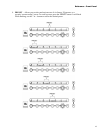
11. If your LSR4300 system is brand new, the RMC button on the front panel of all speakers
will be lit, indicating that Room Mode Correction has not yet been performed. To
calibrate your speakers with RMC, begin by attaching the provided calibration
microphone to a mic stand and place the mic at the mix position, oriented vertically.
Then connect the microphone to the Left speaker’s RMC MIC rear panel input.
To perform an RMC analysis, the calibration microphone must be connected to the
speaker designated as “Left” (LEFT DIP switch up).
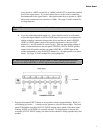
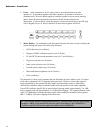
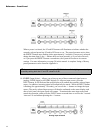
12. Press and hold the RMC button on any speaker, then walk to a spot in the room where you
are not blocking the path between the microphone and any speaker. Each speaker will emit
a reference tone in turn and its meter will show a left-to-right “chase” pattern that
indicates the system is calibrating. When the “chase” pattern on the meters stops, the
process is complete. You can compare the effects of RMC with the uncorrected response
by pressing the RMC button on the front panel of any speaker. When the button is lit,
RMC correction is being bypassed and you hear the uncorrected response; when the RMC
button is unlit, the RMC is active and compensating for any acoustic deficiencies in your
listening environment. (See page 25 in this manual for a step-by-step description of the
RMC calibration procedure.)
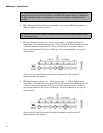
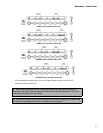
The RMC procedure produces a fairly loud swept sine wave calibration tone that can
surprise you when you hear it for the first time. After pressing the RMC button, move away
from the speaker. There is a five second delay prior to the sounding of the calibration tone.
13. Place the provided batteries in the wireless remote control, and, if you want to
establish computer control over your LSR4300 system, make a USB connection between
your computer and the LEFT speaker and then install the provided LSR4300 Control
Center Software.
14. Finally, put on some good music to listen to and take a few moments to read the rest of
this manual to acquaint yourself with all the features of your JBL LSR4300 system.
Enjoy!
Quick Start