


75
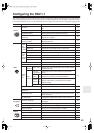
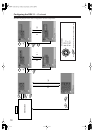
Configuring the RDV-1.1
—Continued
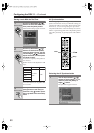
SCART Output Setting
(European model only)
With this setting you can select the video format to be
used for the SCART AV CONNECTOR: RGB, S-Video,
or composite video. Before changing this setting, refer to
your TV’s manual to see if its SCART input can accept
video signals in these formats.
Composite (default)
Composite video offers standard quality.
S-Video
S-Video offers the next best picture quality.
RGB
This format offers the best picture quality. The RGB
indicator appears on the display when this option is
selected.
Notes:
Notes:
• If you select a format that is not supported by your TV,
the setup menu may disappear from the screen. If this
happens, switch off your equipment, connect the
RDV-1.1 to your TV with a composite video or
S-Video cable, and then change this setting.
• Composite, S-Video, and RGB can also be selected
from the front panel. With the RDV-1.1 turned on,
while holding down the Previous [ ] button, press
the [Standby/On] button to select “Composite,”
“S-Video,” or “RGB.”
• When RGB is selected, nothing is output by the com-
ponent video output (see page 27).
PAL Output Setting (not North American
models)
With this setting you can specify how the RDV-1.1 out-
puts video signals when playing NTSC format
discs
.
Auto (default)
Use this option if your TV or projector supports PAL
and NTSC. When you play a PAL disc, the video
output will be PAL. When you play an NTSC disc,
it’ll be NTSC. The RDV-1.1 does not convert the
format.
PAL
Use this option if your TV doesn’t support NTSC
playback, or the picture is distorted when watching
NTSC discs. The RDV-1.1 will convert NTSC for-
mat video to a PAL-compatible format known as
Mod PAL
or
60 Hz PAL
.
Notes:
• This setting can be changed only when playback is
stopped.
•PAL and AUTO can also be selected from the front
panel. With the RDV-1.1 turned on, while holding
down the Next [ ] button, press the [Standby/On]
button to select “Auto” or “PAL.”
Digital Out/Digital1 (i.LINK)
With these settings you can determine how the RDV-1.1
outputs digital audio from its i.LINK sockets and DIGI-
TAL 1 AUDIO OUTs. The options you choose will
depend on the type of component that you connect to the
DIGITAL 1 AUDIO OUTs.
■
Dolby Digital Out
With this setting you can configure the DIGITAL 1
AUDIO OUTs to output Dolby Digital audio as it is or to
downmix it into 2-channel PCM.
Dolby Digital (default)
Choose this option if you’re connecting a component
with a built-in Dolby Digital decoder.
Dolby Digital > PCM
Choose this option if you’re connecting a stereo hi-fi
amp with a digital input, an AV receiver with a built-
in Dolby Pro Logic decoder, or an external D/A
converter.
■
DTS Out
With this setting you can configure the DIGITAL 1
AUDIO OUTs to output DTS audio as it is or to down-
mix it into 2-channel PCM.
DTS (default)
Choose this option if you’re connecting a component
with a built-in DTS decoder.
DTS > PCM
Choose this option if you’re connecting a stereo hi-fi
amp with a digital input or an external D/A converter.
Notes:
• When playing the DTS audio of a DTS CD, set the CD
Audio Setup setting to DTS (see page 81).
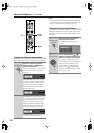
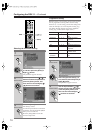
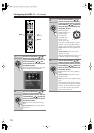
3
When you’ve finished, press the
[Enter] button.
The setting is stored.
Use the same procedure to set the other
parameters, pressing the [Enter] button
when you’ve set each one.
Press the [Setup] button to exit the
onscreen setup menu.
Enter
Remote controller
Audio Menu