


44
Initial Setup
This chapter explains the settings you need to make the
very first time the RDV-1.1 is turned on.
The very first time you turn on the RDV-1.1, the Initial
Setup menu appears onscreen.
Here you need to make a few settings to get the RDV-1.1
up and running. You can change these settings later (see
page 69).
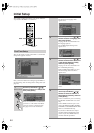
First Time Setup
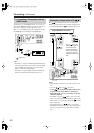
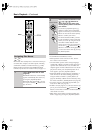
1
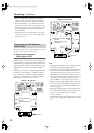
Use the Up and Down [ ]/[ ]
buttons to select a TV shape, and
then press [Enter].
Select 4:3 Letter box or 4:3 Normal if
you have a 4:3 TV. Select 16:9 Wide-
screen if you have a widescreen TV.
See page 73 for more information.
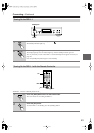
+
10 0
Clear
123
456
789
Input
I
+
-
Enter
S
e
t
u
p
R
e
t
u
r
n
T
o
p
M
e
n
u
M
e
n
u
VOL
+
-
V3
TV
InputDMS
DVD Amp VCR
DVD
V1 V2
LM RD
Zoom
CH
L Mode
Search Memory Dimmer
Amp Input
Display
Audio
Sel
Zoom
On
Picture Control
Random
Step/Slow
Muting
AngleSubtitleAudio
On Standby
T
V
T
V CH
T
V VOL
Last Memory
Resolution
Mode
Amp Input
Rec
Enter
Enter
Enter
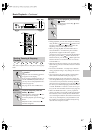
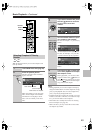
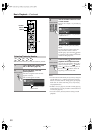
Remote controller
The On-Screen Language menu
appears next.
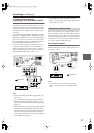
2
Use the Up and Down [ ]/[ ]
buttons to select a language, and
then press [Enter].
See page 82 for more information on
the language options.
The i.LINK Output Setting menu
appears next.
3
Use the Up and Down [ ]/[ ]
buttons to select Off or On for the
i.LINK Output Setting (i.LINK),
and then press [Enter].
See page 77 for more information on
the i.LINK Output Setting.
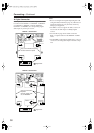
If the i.LINK Output Setting is set to
Off, the Analog Audio Out menu
appears next.
If it’s set to On, the Initial Setup menu
closes.
4
On the Analog Audio Out menu,
use the Up and Down [ ]/[ ]
buttons to select 2 Channel or
Multi Channel (default), and then
press [Enter].
Choose 2 Channel if you’re connecting
the FRONT AUDIO OUTs to a stereo
amp.
Choose Multi Channel if you’re con-
necting the FRONT, SURR 1/SURR 2,
CENTER, and SUBWOOFER AUDIO
OUTs to a multichannel amp.
If you select 2 Channel, the setup is
complete and the Initial Setup menu
closes. If you select Multi Channel,
continue with this procedure.