


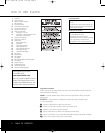

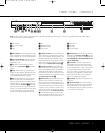
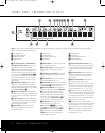

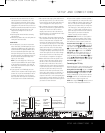

FRONT-PANEL CONTROLS
1 Power Indicator: This indicator lights amber when
the unit is connected to an AC power source, but is not
turned on. When the unit is on, the indicator lights blue.
1
Power On/Off (Standby): Press the button once
to turn the DVD 37 on. Press it again to put the unit
in the Standby mode.
2
Play: Press to initiate playback or to resume
playback after the
Pause Button
3
L
has been
pressed.
3
Pause: Press this button to momentarily pause
playback. To resume playback, press the button again.
If a DVD is playing, action will freeze and a still picture
will be displayed when the button is pressed.
4
Stop: Press this button once to place the disc in
the Resume mode, which means that playback will
stop, but as long as the tray is not opened or the disc
changed,
playback will continue from the same point
on the disc when the
Play Button
2
N
is pressed
again. Resume will also work if the unit was turned off.
Resume will not operate for WMA files or VCDs that do
not have playback control.
T
o stop a disc and have
play start from the beginning, press the button twice.
6 Skip/Search Reverse: Press this button once to
return to the start of the current chapter for a DVD or
track for a CD. Subsequent individual presses will skip
backwards through the available chapters or tracks.
Press and hold the button to play the disc in the fast
reverse mode at the speed indicated in the on-screen
display and by the
Playback Mode Indicators O.
7 Skip/Search Forward: Press this button once
to move to the start of the next chapter for a DVD or
track for a CD. Subsequent presses will skip forward
through the available chapters or tracks. Press and
hold the button to play the disc in the Fast Play mode
at the speed indicated in the on-screen display and by
the
Playback Mode Indicators O.
8 Remote Sensor: The sensor that receives com-
mands from the remote control is behind the front
panel in this area. To ensure proper operation of the
player with the remote, it is important that this area not
be covered. In the event that the player is enclosed in
a cabinet or if the remote sensor is covered, you may
extend the remote sensor by connecting an optional,
exter
nal remote sensor to the
Remote Control Input
™ on the rear panel (see page 14). When optional,
external IR “blasters” are used for system control, they
should be positioned so that they point at this area.
8
Display Dimmer: Press this button to reduce the
brightness of the
Information Display @ by 50% or
to turn the display off completely in the following order:
FULL BRIGHTNESS ➔ HALF BRIGHTNESS ➔ OFF
➔ FULL BRIGHTNESS.
) Disc Drawer: This drawer is used to hold the
discs played in the unit. Be certain to seat all discs
carefully within the recess in the drawer. Do not press
down on the drawer when it is open, to avoid damage
to the player. When the drawer is left open with no
activity for 5 minutes, it will automatically close to pre-
vent dust or dirt from entering the component, and to
prevent accidental damage. If a disc is present, the
DVD 37 will immediately begin playback.
!
Open/Close
:
Press this button to open or close
the disc tray.
@ Information Display: The Information Display
provides status infor
mation on the player and the disc
being played through a series of specific indicators
and messages that appear in the display. See page 10
for more information on the display.
0
Power Indicator
1
Power On/Off (Standby)
2
Play
3
Pause
4
Stop
5
Skip/Search Reverse
6
Skip/Search Forward
7
Remote Sensor
8
Display Dimmer
9
Disc Drawer
!
Open/Close
@ Infor
mation Display
Open/Close
DVD 37
1
2
3
4 5
6 7 89
)
!
@
JPEG
V
CD
DVD
WMA
REPEAT
1 ALL
A – B
V. OFF
P. SCAN
TEST
MP3
PROG
R
ANDOM
TITLE
TRACK
CHAP
PBC
H
OUR
MIN
SEC
Open/Close
DVD 47
AUDIO/VIDEO
A
UDIO/VIDEO
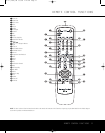
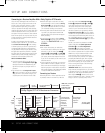
NOTE: To make it easier to follow the instructions that refer to the controls and connectors in this illustration, a larger copy may be downloaded from the Product Support
s
ection for this product at www.harmankardon.com.
FRONT-PANEL CONTROLS 9
DVD 37 (120V) OM 8/7/06 4:10 PM Page 9