


Page 18
Page 19
MPS-1 Installation Accessories
The MPS-1 Modular Power Amplier comes with some additional installation accessories that make
the component t into virtually any installation theme.
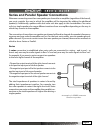
Piano Black Wood Side Panels
The MPS-1 comes with attractive wood side panels in a stunning piano black lacquer nish. As this
electronic component is going to be in many homes alongside equally nice furniture, the side panels
allow the MPS-1 to look a little more like it belongs in the room. Although every installation will not
require them, they are included for the owner to use if he/she so chooses.
To clean the piano black nish, simply use a damp cloth (dampened with water) and wipe them down.
Then use a soft dry cloth to dry and bu the nish to its original shine. Do not use any chemicals on
the side panels. Chemical cleaners may cloud the nish of the laquer.
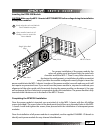
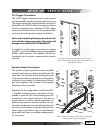
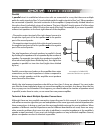
Rack Mount Installation Hardware
In the event the user chooses to mount the MPS-1 in a “rack mount” conguration, the unit has rack
mount ears included. To install the MPS-1 into a rack mounting conguration, the following details
must be completed.
1) The piano black wood side panels must be removed, This is accomplished by simply removing
the four #2 Phillips screws on each panel.
2) The four aluminum feet of the MPS-1 chassis must also be removed. This is accomplished by re-
moving one #2 Phillips screw directly in the center of the foot
3) Remove two #2 Phillips screws attached at the front edge of the side panel.
4) Attach the rack mount ears to the side panels using the longer #2 Phillips screws provided.
5) When installing into a rack mounting position, be sure to provide adequate support from the
sides and/or rear of the unit to avoid any unnecessary stress on the chassis.
6) Be sure the MPS-1 has adequate ventilation. At least 1 empty rack space above AND below the chassis
will allow fresh air to circulate around the unit.