


ENGLISH
OPERATION
PROCEDURE
81
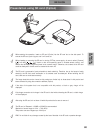
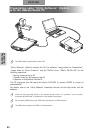
■ Saving the Image
(1) Press the []button on the front operating panel or wireless remote control to
switch the image mode to the Camera mode.
(2) Press the
[]button on the front operating panel or wireless remote control.
(3) When the
[]mark lights up on the screen, the image saving starts. When this mark
goes out, the image saving is completed.
Be sure to try out shooting and saving beforehand to confirm the normal saving of the image. If the
image fails to be saved due to some problems in the camera or SD card, ELMO is not liable for any
compensation for the recorded contents.
The
[]mark on the screen is displayed only when the [Guide] menu is set to ON.
When the SD card is write-protected, the image cannot be saved in the SD card.
When the capacity of the SD card becomes full and no more images can be saved, the
[]mark
does not light up. Then, delete unnecessary images or use a new SD card.
When the SD card is in the read/write mode, do not remove the SD card, or failure could occur with
this product.
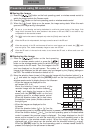
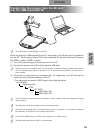
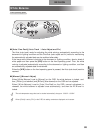
■ Displaying the image
(1) Press the []button on the front operating
panel or wireless remote control or press the []
button on the wireless remote control to switch the output
image mode to the SD mode. Then, the images in the SD
card are displayed on the split screen. The number of
images to be displayed on the split screen can be changed by the [Display] settings on
the OSD. The number of divisions on default is 3×3.
(2) Move the selection frame (cursor) of the recorded image with the direction buttons
[
], and select the images with the [ENTER] button on the front operating panel or
wireless remote control to display them on the full-screen.
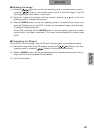
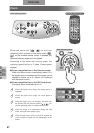
• When the images are displayed on the
split screen (3
×3, 4×4)
Move the selection frame (cursor) of the
recorded image with the direction buttons [
], and display the images on the full-
screen with the [ENTER] button on the front
operating panel or wireless remote control.
When the direction button []is held down,
the selection frame (cursor) moves as shown in
the right figure.
• When the images are displayed on the
full-screen
When the direction button
[]or []on the
front operating panel or wireless remote control is pressed, the next image is displayed.
When the direction button []or []on the front operating panel or wireless remote
control is pressed, the previous image is displayed. The image displayed on the full
screen can be zoomed in/out with the zoom dial on the front operating panel or the
zoom button on the wireless remote control. When the image is zoomed in, the
displayed part of the image can be scrolled with the direction buttons [].
When the [ENTER] button on the front operating panel or wireless remote control is
pressed, the display on the split screen is resumed.
(To the top of
the next page)
Cursor
3
×
34
×
4
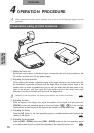
Presentation using SD card (Option)
(Continued)