


32
ENGLISH
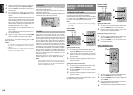
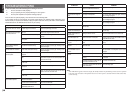
AUX2 INPUT
If you don’t need to connect 7.1 Ch. input terminals
with multi channel decoder,
L(front left) and R (front right) inputs terminals are
available as AUX2 input.
In this case, You can connect additional audio source
to AUX2 as other audio input terminals.
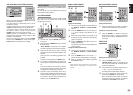
LIP.SYNC
Depending on the image device (TV, monitor,
projector, etc.) connected to the DN-A7100, a time
lag can occur between image signal processing and
audio signal processing. Though minor, this time
lag can interfere with movie and music enjoyment.
The LIP.SYNC feature delays the audio signal with
respect to the image signal output from the DN-
A7100 to correct the time lag between the sound
and image. It can be operated with the “LIP.SYNC”
and 1 and 2 cursor buttons of the remote controller.
Set the remote controller to the AMP mode before
operating the LIP.SYNC feature. The initial setting is
OFF (0 ms).The time lag can be adjusted in 10 ms
steps up to 200 ms.
Watch the picture on the image device (i.e., TV,
monitor, projector, etc.) as you adjust the time lag.
Note:
The LIP.SYSNC feature turns OFF (0 ms) in the
PURE DIRECT mode. When the PURE DIRECT
mode is deactivated, the set value of the LIP.SYSNC
feature is automatically restored.
BASIC OPERATION
(TUNER)
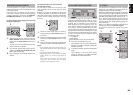
LISTENING TO THE TUNER
Frequency scan step for AM is selectable.
Default setup is 9 kHz step, if your country’s standard
is 10 kHz step, Press BAND button on the remote
more than 6 seconds. Scan step will change.
Note:
Preset memory for the tuner will clear by changing
this setup.
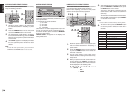
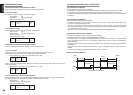
AUTO TUNING
2.
1.
1. 2.
(Using the DN-A7100)
1.
To select tuner and desired band (FM or AM),
press the BAND button on the front panel.
2.
Press the
3 or 4 cursor buttons
on the front
panel for more than 1 second to start the auto
tuning function.
3.
Automatic searching begins then stops when a
station is tuned in.
(Using the remote control unit)
1.
To select tuner and desired band (FM or AM),
press the BAND button on the remote.
2.
Press the TUNING –
/
+ for more than 1 second
on the remote.
3.
Automatic searching begins then stops when a
station is tuned in.
If tuning does not stop at the desired station, use to
the “Manual tuning” operation.
MANUAL TUNING
2.
1.
1. 2.
(Using the DN-A7100)
1.
To select tuner and desired band (FM or AM),
press the BAND button on the front panel.
2.
Press the
3 or 4 cursor buttons
on the front
panel to select the desired station.
(Using the remote control unit)
1.
To select tuner and desired band (FM or AM),
press the BAND button on the remote.
2.
Press the TUNING –
/
+ on the remote to tune
in the desired station.
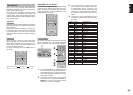
DIRECT FREQUENCY CALL
3.
1.
2.
1.
To select tuner and desired band (FM or AM),
press the BAND button on the remote.
2.
Press the F.DIRECT on the remote, display will
show “FREQ - - - -”.
3.
Input your desired station’s frequency with the
numeric buttons on the remote.
4.
The desired station will automatically be tuned.
1.
Select a desired Video source to decide the
routed video signal to the Monitor Outputs.
2.
Press 7.1 CH IN on the remote to switch the 7.1
channel input.
3.
If it is necessary to adjust the output level of
each channel, press the CH.SEL button on the
remote.
Adjust the speaker output levels so that you can
hear the same sound level from each speaker
at the listening position. For the front left, front
right, center, surround left, surround right and
surround back speakers, the output levels can
be adjusted between –10 to +10 dB.
The subwoofer can be adjusted between –15
and +10 dB.
These adjustments result will be stored to 7.1
CH. INPUT memory.
4.
Adjust the main volume with the VOLUME
knob or the VOL –/+ buttons on the remote.
To cancel the 7.1 CH. INPUT setting, press 7.1 CH
IN on the remote.
Notes:
• 7.1 CH. Input mode bypasses the internal surround
processing, so SURROUND mode cannot be
selected.
• In addition, there is no signal at the record outputs
when the 7.1 CH. Input is in use.