


Mixers and playback devices produce line level
outputs. These sources typically have low-to-medium
output impedance and may be balanced or unbalanced.
They can sometimes be interfaced with a simple adapter
cable. However, these high level input sources often
require additional (external or internal) attenuation to
prevent overload of the transmitter input, which is usually
expecting a mic-level signal.
Once the source/transmitter interface has been
optimized, control adjustment should be performed. The only
control adjustment available on most transmitters is for input
level or sensitivity. It consists of a small potentiometer and/or a
switch. The control is often placed inside the battery
compartment or in a recessed position to avoid accidental
maladjustment. Some bodypack designs have separate level
adjustments for microphone inputs and instrument inputs.
The control(s) should be adjusted so that the loudest
sound level (or highest instrument level) in actual use
produces full modulation of the radio signal. This is usually
determined by speaking or singing into the microphone
(or playing the instrument) while observing audio level
indicators on the receiver. Typically, an audio peak LED will
indicate full (or nearly full) modulation. A few designs have
peak indicators on the transmitters themselves. In systems
that indicate peaks at less than full modulation, this LED may
light fairly often. For systems that indicate full modulation,
this should light only briefly at maximum input levels.
In either case, sustained peak indication requires reducing
input sensitivity or level to avoid audible distortion.
If the transmitter is equipped with a compander system
(noise reduction) defeat switch make sure that it is set to
the same mode as the receiver. The only situation in which
this system would be defeated is with the use of a
receiver that is not equipped with compander circuitry.
For tuneable transmitters, make sure that the
transmitter is set to the same frequency as the receiver.
The last step in transmitter setup is placement.
Placement of a handheld or plug-on system is essentially
the same as for a wired microphone of the same type. The
unit may be mounted on a stand, boom or fishpole with an
appropriate stand adapter, or it may be handheld.
Bodypack transmitter placement is dependent on the
particular application. If the input source is a microphone,
such as a lavaliere or headset, the bodypack is normally
clipped to a belt or pants waistband. It may be attached in
other ways as long as the antenna is allowed to extend
freely. Insure that there is adequate access to the controls if
necessary and that the connecting cable, if any, has enough
length to permit the source and the transmitter to be
located as desired. When the input is a musical instrument,
it is often possible to attach the transmitter directly to the
instrument or to its strap as in the case of an electric guitar.
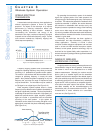
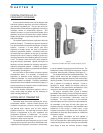
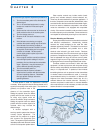
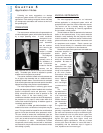
For all types of transmitters, insure that the antenna is
securely attached and positioned for maximum efficiency.
Wire antennas should be fully extended. The hand should
not cover external antennas on handheld transmitters.
(See Figure 4-3.)
As much as possible, proper transmitter placement
should avoid large metal objects and previously mentioned
sources of RF such as digital devices and other wireless
transmitters. If an individual is using more than one wireless
system at the same time, such as a wireless head-set and a
wireless musical instrument, or is wearing a wireless
personal monitor receiver, the devices should be kept as far
apart as practical to minimize interaction.
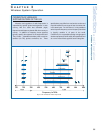
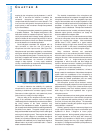
SYSTEM SETUP: RECEIVERS
Receiver setup involves two interfaces: antenna-to-
receiver and receiver-to-sound system. (See Figure 4-4.)
39
C HAPTER 4
Selection
and Operation
of Wireless Microphone Systems
Figure 4-3: proper and improper antenna positions
NO
✓OK
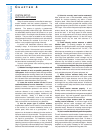
Figure 4-4:
receiver examples
fixed
portable