


XDZ716 1312 XDZ716
Radio Operations
FM Reception
For enhanced FM performance the
tuner includes signal actuated stereo control,
Enhanced Multi AGC, Impulse noise reduction
curcuits and Multipath noise reduction circuits.
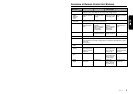
Changing the reception area
This unit is initially set to USA frequency intervals
of 10 kHz for AM and 200 kHz for FM. When using
it outside the USA, the frequency reception range
can be switched to the intervals below.
● Setting the reception area
1. Press BND button
"
and select the desired
radio band (FM or AM).
2. While pressing DISP button
#
, each time you
press and hold the number “6” of the Preset
buttons
9
for 2 seconds or longer, the recep-
tion area switches from inside the USA to
outside the USA or from outside the USA to
inside the USA.
∗ Any station preset memories are lost when the
reception area is changed.
Listening to the radio
1. Press FUNCTION button 3 and select the
radio mode. The frequency is displayed.
2. Press BAND button
"
and select the radio
band. Each time the button is pressed, the radio
reception band changes in the following order:
FM1 ➜ FM2 ➜ FM3 ➜ AM ➜ FM1...
3. Press the right or left side of SEARCH button
% to tune in the desired station.
Tuning
There are 3 types of tuning mode available, seek
tuning, manual tuning and preset tuning.
Seek tuning
1. Press BAND button
"
and select the desired
band. (FM or AM)
∗ If “MANU” is lit in the display, press and hold
BAND button
"
for 1 second or longer.
“MANU” in the display goes off and seek tuning
is now available.
2. Press the right or left side of SEARCH button
% to automatically seek a station.
When the right side of SEARCH button % is
pressed, the station is sought in the direction
of higher frequencies; if the left side of
SEARCH button % is pressed, the station is
sought in the direction of lower frequencies.
Manual tuning
There are 2 ways available: Quick tuning and step
tuning.
When you are in the step tuning mode, the fre-
quency changes one step at a time. In quick tun-
ing mode, you can quickly tune the desired fre-
quency.
1. Press BND button " and select the desired
band (FM or AM (MW/LW)).
∗ If “MANU” is not lit in the display, press and
hold BND button " for 1 second or longer.
“MANU” is lit in the display and manual tuning
is now available.
2. Tune into a station.
● Quick tuning:
Press and hold the right or left side of
SEARCH button % for 1 second or longer to
tune in a station.
● Step tuning:
Press the right or left side of SEARCH button
% to manually tune in a station.
Recalling a preset station
A total of 24 preset positions (6-FM1, 6-FM2, 6-
FM3, 6-AM) exists to store individual radio sta-
tions in memory. Pressing the corresponding pre-
set button recalls the stored radio frequency au-
tomatically.
1. Press BND button " and select the desired
band (FM or AM (MW/LW)).
2. Press the corresponding Preset button 9 to
recall the stored station.
∗ Press and hold one of Preset buttons 9 for 2
seconds or longer to store that station into pre-
set memory.
Manual memory
1. Select the desired station with seek tuning,
manual tuning or preset tuning.
2. Press and hold one of Preset buttons 9 for 2
seconds or longer to store the current station
into preset memory.
Auto store
Auto store is a function for storing up to 6 sta-
tions that are automatically tuned in sequentially.
If 6 receivable stations cannot be received, a pre-
viously stored station remains unoverwritten at
the memory position.
1. Press BND button " and select the desired
band (FM or AM (MW/LW)).
2. Press the SEARCH button % and select from
“TREB
GAIN ” ➜ “TREB F 12K ” ➜
“TREB
GAIN ”.
3. Turn the Rotary knob ( clockwise or coun-
terclockwise as needed and adjust the gain
and the F (center frequency).
TREB GAIN : –6 to 6 (The factory default
setting is “0”)
TREB F : 8KHz/12KHz (The Factory
default setting is “12K”)
4. When the adjustment is complete, press A-M
button $ several times until the function mode
is reached.
Adjusting the balance
1. Press A-M button $ and select “BALANCE”.
2. Turning the Rotary knob ( clockwise empha-
sizes the sound from the right speaker; turn-
ing it counterclockwise emphasizes the sound
from the left speaker.
∗ The factory default setting is “0”. (Adjustment
range: L13 to R13)
3. When the adjustment is complete, press A-M
button $ several times until the function mode
is reached.
Adjusting the fader
1. Press A-M button $ and select “FADER”.
2. Turning the Rotary knob ( clockwise empha-
sizes the sound from the front speakers; turn-
ing it counterclockwise emphasizes the sound
from the rear speakers.
∗ The factory default setting is “0”. (Adjustment
range: F12 to R12)
3. When the adjustment is complete, press A-M
button $ several times until the function mode
is reached.
Adjusting the Beat EQ
1. Press BEQ button 8 and select the Beat EQ
mode (1 to 3) to adjust.
2. Press A-M button $ and select “BASS
BOOST or IMPACT or EXCITE”.
3. Turning the Rotary knob ( clockwise adjusts
in the + direction; turning it counterclockwise
adjusts in the – direction.
∗ When BASS BOOST is selected, you can ad-
just the bass in the range of –3 to 3.
∗ When IMPACT and EXCITE is selected, you can
adjust the bass and treble in the range of –3 to 3.
Basic Operations
4. When the adjustment is complete, press A-M
button $ several times until the function mode
is reached.
Turning on/off the loudness
The loudness effect emphasizes the bass and
treble to create a natural sound tone. When you
are listening to music at a low volume, it is rec-
ommended to use the loudness effect.
1. Press and hold LOUD button $ for 1 second
or longer to turn on the loudness effect. When
the loudness effect is turned on, “LD” lights in
the display.
2. Press and hold LOUD button $ for 1 second
or longer to turn off the loudness effect. “LD”
goes off in the display.
Note:
• When using a sold separately digital sound pro-
cessor (DPH910), a feature called auto loudness
is selected. This function is different from the loud-
ness effect. For further details on the auto loud-
ness feature, refer to the subsection “Output ad-
justment of auto loudness, subwoofer and
playback band” in section “AC Processer
Operations”.