


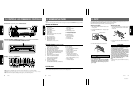


XDZ716 2322 XDZ716
AC Processor Operations
DSP control function
If the DSP (DPH910), sold separately, is con-
nected to this unit using the CeNET cable, all
functions of the AC Processor can be controlled.
DSF functions
There are 2 modes available in DPH910, STD
mode and professional mode. Choose one of them
and adjust the sound field and the sound quality.
∗ STD mode: Standard mode
● Functions common to each mode:
Auto loudness, etc.
● Standard mode:
Adjustment using the graphic equalizer function
and the DSF function.
● Professional mode:
Adjustment using the VSE function and the para-
metric equalizer function.
∗ When the STD mode is selected, adjustment for
the professional mode cannot be made. On the
contrary, when the professional mode is selected,
adjustment for the STD mode cannot be made.
∗ For details on functions of each mode, refer to
the owner’s manual supplied with the DPH910.
∗ Hereafter the graphic equalizer is referred to as a
G.EQ, the space equalizer referred to as VSE and
the parametric equalizer referred to as P.EQ.
Operations common to each mode
Output adjustment of auto loudness,
subwoofer and playback band
1. Press and hold ADJ button 2 for 1 second or
longer to switch to the adjustment selection
display.
2. Press the right or left side of SEARCH button
% to select “SOUND”.
3. Press ENT button &.
4. Press the right or left side of SEARCH button
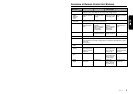
% to select the adjustment item.
There are “A.LD LEVEL”, “WOOFER OUT”,
“WOOFER LPF”, “HPF” and “TEST TONE”
available for the adjustment items.
∗
For details on each adjustment item, refer to the
owner’s manual supplied with the DPH910.
5. Turn the Rotary knob ( clockwise or coun-
terclockwise to make the adjustment.
6. Pressing ENT button & returns to the adjust-
ment selection display.
7. Press ADJ button 2 to return to the previous
mode.
Selecting the easy mode or the
professional mode
∗ The factory default setting is “STD”.
1. Press and hold ADJ button 2 for 1 second or
longer to switch to the adjustment selection
display.
2. Press the right or left side of SEARCH button
% to select “AC-P SEL”.
3. Turn the Rotary knob & clockwise or coun-
terclockwise to set the mode to “STD” or
“PRO”.
4. Press ADJ button 2 to return to the previous
mode.
Entering titles
You can give a title to the user memory of the
DSF, G.EQ, VSE and P.EQ that you have ad-
justed yourself.
1. Press A-M button $ to select the adjustment
mode in which you want to give a title.
2. Press BND button " to select “USR”. “USR”
will be displayed in the operation status indi-
cation -.
3. Press one of Preset buttons 9 to select the
user memory to which you want to give a title.
4. Press TITLE button 2.
5. Press the right or left side of SEARCH button
% to move the cursor.
6. Press DISP button # to select the character
fonts.
There are capital letters, small letters,
numbers, symbols and umlaut available for
the character.
7. Turn the Rotary knob ( clockwise or counter-
clockwise to select the character you want to
input.
8. Repeat steps 5 to 7 to input the title.
9. Press and hold ENT button & for 2 seconds
or longer to put the title into memory. The title
input mode is cancelled.
STD mode/G.EQ operations
Note:
• The adjustment made in standard mode is not re-
flected in the adjustment in professional mode. On
the contrary, the adjustment made in professional
mode is not reflected in the adjustment in easy
mode.
1. Press BND button " and select the desired
band (TV1 or TV2).
∗ If “MANU” is not lit in the display, press and
hold BND button " for 1 second or longer.
“MANU” lights in the display and manual tun-
ing is now available.
2. Tune into a station.
● Quick tuning:
Press and hold the right or left side of
SEARCH button % for 1 second or longer to
tune in a station.
● Step tuning:
Press the right or left side of SEARCH button
% to manually tune in a station.
Recalling a preset station
A total of 12 TV stations can be stored (6-TV1
and 6-TV2). This allows you to select your favorite
TV stations and store them in memory for later
recall.
1. Press BND button " and select the desired
TV band (TV1 or TV2).
2. To recall a stored TV station, press the de-
sired Preset button 9 to select that station.
∗ Press and hold one of Preset buttons 9 for 2
seconds or longer to store the current station
into the preset memory.
Manual memory
1. Select the desired station with seek tuning,
manual tuning or preset tuning.
2. Press and hold one of Preset buttons 9 for 2
seconds or longer to store the current station
to that preset memory.
Auto store
Auto store selects 6 TV stations automatically
and stores each one into a preset memory.
If there are not 6 stations with good reception,
stations previously stored in memory remain and
only the strong stations are stored into memory.
1. Press BND button " and select the desired
TV band (TV1 or TV2).
2. Press and hold AS button 5 for 2 seconds or
longer. The stations with good reception are
stored automatically to the preset channels.
TV Operations
Preset scan
Preset scan allows the user to view each preset
position before it automatically advances to the
next preset. This function is useful for searching
for desired TV station in memory.
1. Press PS button 5.
2. When the desired station is found, press PS
button 5 again to remain tuned to that station.
Note:
• Do not press and hold PS button
5
for 2 seconds
or longer. Doing so will trigger the auto store
function and start storing stations into memory.
Setting the TV diver
You can change the reception setting for the TV
antenna connected to the TV tuner.
1.
Press and hold ADJ button 2 for 1 second or
longer to switch to the adjustment selection display.
2. Press the right or left side of SEARCH button
% to select “TV DIVER”.
3. Turn the Rotary knob ( clockwise to set to
“ON” or counterclockwise to set to “OFF”.
● ON:
Sets reception emphasizing the visual.
● OFF:
Sets the diver setting to OFF.
4. Press ADJ button 2 to return to the previous
mode.