


24
Emerge EMS Installer/User Guide
Chapter 3: Operations
25
Adjustments
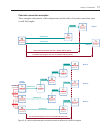
Video signals are susceptible to the effects of long distance cables and for this reason, every
Emerge EMS receiver includes brightness and sharpness adjustment dials. Additionally, the
Emerge EMS1000MP-R receivers are also equipped with two extra dials to eliminate the effects
of color skew within the video image.
Brightness and Sharpness Adjustments
The brightness and sharpness adjustments provided on
every Emerge EMS receiver allow you to compensate for
any losses incurred within long cable links. These two
adjustments can be made in any order and independently
of each other.
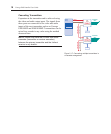
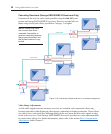
When making adjustments it is necessary to have access
to the Emerge EMS receiver and to be able to view one
or both connected display screens. Both adjustments,
sharpness in particular, are made easier when viewing
high contrast images with vertical edges, such as black
lines on a white background.
NOTE: Both video outputs are equally affected by your brightness and/or sharpness adjustments.
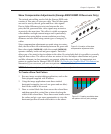
To Display a Suitable High Contrast Image
• Open a word processor, type the capital letter ‘H’, or
‘M’ and increase the point size to 72 or higher. For
best results, the background should be white and the
character should be black.
• A BLACK shadow on the right of the character
indicates UNDER compensation.
• A WHITE shadow on the right of the character
indicates OVER compensation.
High contrast
black
character
on white
background
Black or bright white
shadow on the right
indicates the need for
sharpness adjustment
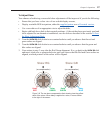
To Adjust Brightness and/or Sharpness
1. Carefully insert a small screwdriver into the dial labeled BRIGHT or SHARP, as appropriate.
2. Slowly turn the dial clockwise or counterclockwise and observe the effect shown on the
screen. Withdraw the screwdriver when the displayed image is shown at its optimum clarity.
3. If necessary, repeat step 2 for the other dial.
Figure 3.2: Location of the brightness
and sharpness adjustment dials
Figure 3.3: Using a high contrast image to assist with
sharpness adjustments