


LUNA™ User Manual
12
LUNA™ User Manual
13
Basic Setup
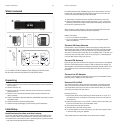
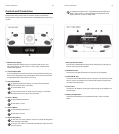
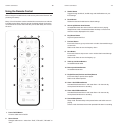
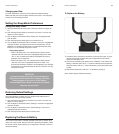
Luna is controlled using the two control knobs at the front of the unit and
the two buttons at the rear of the unit. Luna’s innovative menu system looks
and functions much like your iPod, so it is easy to navigate. Please review
the CONTROLS AND CONNECTIONS section to learn about the controls.
This section will guide you through the basic setup using the menu system.
The instructions for each section are written to guide you through Luna’s
features and settings starting from the main screen where the time and date
are displayed. To get started, we recommend you access each menu item
from this main screen.
To return to the main screen from any menu, turn the Right Control Knob
until the “Exit” menu item is highlighted and push to select. Alternatively,
you can push and hold the Right Control Knob to exit the menu, or allow
the menu to timeout after 30 seconds of inactivity. Note that when making
changes to settings, Luna will not save the changes unless you have
accepted the changes by pressing the Right Control Knob.
Setting the Time:
1. Push the Right Control Knob to access the main menu. The menu will
appear on Luna’s display.
2. Turn the Right Control Knob until the “Settings” menu item is highlighted
and push to select.
3. Push the Right Control Knob again to select the “Time” menu item. The
hour will blink to indicate that it can be adjusted. Turn the Right Control
Knob to change the hour, AM or PM (indicated by an “A” or “P” next to
the time) and push to accept the correct hour and advance to adjust the
minutes.
4. The minute section will then blink to indicate that it can be adjusted. Turn
the Right Control Knob to change the minutes and push to accept and
save your changes.
Setting the Date:
1. Push the Right Control Knob to access the main menu. The menu will
appear on Luna’s display.
2. Turn the Right Control Knob until the “Settings” menu item is highlighted
and push to select.
3. Turn the Right Control Knob until the “Date” menu item is highlighted
and push to select.
4. Push the Right Control Knob again to select the year. The year will
blink to indicate that it can be adjusted. Turn the Right Control Knob to
change the year and push to accept and save your changes.
5. Turn the Right Control Knob again until the “Month” menu item is
highlighted and push to select. The month will then blink to indicate that
it can be adjusted. Turn the Right Control Knob to the change the month
and push to accept and save your changes.
6. Turn the Right Control Knob again until the “Day” menu item is
highlighted and push to select. The day will then blink to indicate that it
can be adjusted. Turn the Right Control Knob to the change the day and
push to accept and save your changes.
Note: The day of the week will be displayed automatically.
Setting the Display Options:
1. Push the Right Control Knob to access the main menu. The menu will
appear on Luna’s display.
2. Turn the Right Control Knob until the “Settings” menu item is highlighted
and push to select.
3. Turn the Right Control Knob until the “Display Options” menu item is
highlighted and push to select .
4. Turn the Right Control Knob to highlight either “Contrast” or “Dimmer”
and push to select. The level will blink to indicate that it can be adjusted.
5. Turn the Right Control Knob to increase/decrease the level for contrast
(from 0 to 60) and for the dimmer (from 0 to 20) push to accept and save
your changes. If you set the dimmer to a level lower than 5, touching
any control will automatically bring the dimmer up to a level 5 for a few
moments so that you can make adjustments to your settings.
Note: You may also invert the display colors through the “Display Options”
menu.
Setting the Date and Time Format:
Luna’s default date format is Month, Day, Year (MM.DD.YY) and default
time format is a 12-hour clock. To select Day, month, year (DD.MM.YY)
and/or to select a 24-hour clock format, follow these instructions:
1. Push the Right Control Knob to access the main menu. The menu will
appear on Luna’s display.
2. Turn the Right Control Knob until the “Settings” menu item is highlighted
and push to select.
3. Turn the Right Control Knob until the “Format” menu item is highlighted
and push to select.
4. Turn the Right Control Knob to highlight either “Time Format” or “Date
Format” and push to select.
5. Turn the Right Control Knob to highlight your preferred format and push
to select. This will automatically turn the selected format to “ON” the
other format to “OFF”.
Setting the Daylight Savings Time Option:
1. Push the Right Control Knob to access the main menu. The menu will
appear on Luna’s display.
2. Turn the Right Control Knob until the “Settings” menu item is highlighted
and push to select.
3. Turn the Right Control Knob until the “DST” menu item is highlighted and
push to toggle between “OFF” and “ON”. Activate this feature when Day
Light Savings Time is in effect. This will advance the time one hour.
Setting the Alarms
Luna’s two alarms work independently from each other, allowing you to
customize each one to your preference. You can set the time, wake to
source, volume/volume ramping, dimmer brightness and even snooze time
for each.
Setting Alarm Time:
1. Push the Right Control Knob to access the main menu. The menu will
appear on Luna’s display.
2. Turn the Right Control Knob to highlight either “Alarm 1” or “Alarm 2”
and push to select.
3. Push the Right Control Knob again and the hour will blink to indicate it
can be adjusted. Turn the Right Control Knob to change the hour, AM or
PM (indicated by an “A” or a “P” next to the time) and push to accept the
correct hour and advance to adjust the minutes.
SHORTCUT
You may turn the Right Control Knob to increase/
decrease the brightness of the display at any time,
except when in menu or sleep mode.