


LUNA™ User Manual
18
LUNA™ User Manual
19
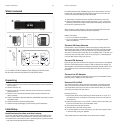
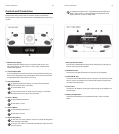
Charging your iPod:
Luna will charge dock connector iPod models (4G models and later).
Make sure that your iPod is properly docked in the system. Once properly
docked, Luna will charge your iPod.
Setting the Sleep Mode Preferences
Setting the Sleep Timer:
1. Select the desired audio source (see “Listening to Audio” on pages 16-
17).
2. Push the Right Control Knob to access the main menu. The menu will
appear on Luna’s display.
3. Turn the Right Control Knob until the “Sleep” item is highlighted and
push to select.
4. Push the Right Control Knob again to turn sleep timer on.
5. Turn the Right Control Knob until the “Duration” menu item is highlighted
and push to select. The sleep time will blink to indicate that it can be
adjusted. Turn the Right Control Knob to increase/decrease the sleep
time (from 1 to 90 minutes) and push to accept.
Setting Sleep Options
– While in the sleep menu, turn the Right Control Knob until the
“Decrease Volume” menu item is highlighted and push to select
“On” or “Off”. Activating this feature will decrease the volume
gradually over the sleep time.
– While in the sleep menu, turn the Right Control Knob until the
“Dimmer” menu item is highlighted and push to select. The
dimmer level will blink to indicate it can be adjusted. Turn the Right
Control Knob to increase/decrease the dimmer level (from 0 to 20)
and push to accept.
SHORTCUT
You may also enter the sleep mode by holding the
Right Control Knob while audio is playing. The sleep
time will appear in the top line of the display.
Turn the Right Control Knob at any time to increase/
decrease the sleep time.
Restoring Default Settings
Using this operation will reset all of your programmed settings back to
factory default settings (except contrast).
1. Push the Right Control Knob to access the main menu. The menu will
appear on Luna’s display.
2. Turn the Right Control Knob until the “Settings” menu item is highlighted
and push to select.
3. Turn the Right Control Knob until the “Reset Settings” menu item is
highlighted and push to select.
4. Push the Right Control Knob again to confirm reset.
Replacing the Remote Battery
The remote control battery is already installed at the factory. Before using,
make sure to pull out the “Remove” tab that is protecting the battery. When
the remote control stops operating or its range seems reduced, it is time to
replace the battery.
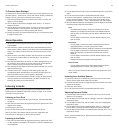
To Replace the Battery:
1. The battery door is located on the bottom of the remote control. To open,
hold the remote with the back facing up and squeeze the latch while
pulling out the battery door.
2. Take out current battery and replace with a “CR2025” 3-volt Lithium Cell
battery. The battery door has a “+” symbol to indicate correct placement.
Place the battery with the “+” side of the battery on the same side as this
symbol.
3. Replace the battery door with the “+” of the battery facing up.
Note: Please dispose of batteries properly.