


Model MX88 Page: 17
© 2010 Xantech LLC
IR CONTROL CONNECTIONS
8-zone system:
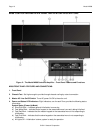
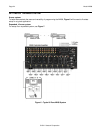
Plug the supplied 283D IR emitters into the appropriate IR Emitter jacks - Figure 3-(26). Take care to match
the source audio and video connection number on the MX88 to the IR Emitter jack number. This will ensure
that the IR control signal will be routed to the correct source component. Find the IR sensor window on the
source component and attach the emitter to the components sensor window after removing the protective
paper cover on the flat side of the emitter head. A Common IR jack is also provided for connection to other
auxiliary devices that are not source specific - Figure 3 item 27.
Expanded, 16-zone system:
Connect the emitters to the Primary Controller‟s IR Emitter jacks - Figure 3 item 26 as noted above.
Note: The appropriate source IR Emitter of the Secondary Controller will also flash regardless of what
zones keypad issues the command but it is recommended to use the emitter jacks of the Primary unit.
SENSE INPUT CONNECTIONS
8-zone system:
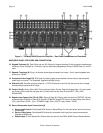
The sense input connection will typically be used to sense the power state of a source component using
any of the Xantech Sense Modules (sold separately). Plug the 3.5mm mini plug from the Xantech sensor
into the appropriate sense jack – Figure 3 item 22. Take care to match the source audio and video
connection number on the MX88 to the appropriate sense jack number. Please refer to instructions included
with the specific sensor that you are using for set up and any necessary adjustments.
Expanded, 16-zone system:
Connect the Xantech sensors as described above to the Primary Controller. Sense inputs on the Secondary
Controller are inactive and are not to be used.
BI-DIRECTIONAL CONTROL PORTS
RS232 Ports 1 and 2:
These DB15 ports, when used with the included DB15-to-DB9 adaptor cables, can be used for controlling
and receiving status information/metadata from external devices and components, or for allowing external
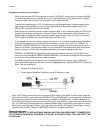
devices to control the MX88. Port 1 can also be used to link one MX88 to another, using the supplied DB15-
to-DB15 expansion cable, creating a 8 source/16-zone “Expanded” system.
Ethernet jack (MX88vi and MX88ai only):
Used for connection to a Local Area Network, and allowing control of all the zones of MX88vi or ai from
almost any wired or wireless IP-enabled device with web browsing capabilities, such as the Apple® iPad®,
Windows® and Android™ tablets, and PCs. It also allows for some limited 2-way external device control,
subject to expansion in the future. The MX88 comes with DHCP enabled so that it can be accessed through
a dynamically enabled network. Its address should be fixed to a fixed IP address that is supported by your
Local Area Network, using the “MRIP Installer” program that can be downloaded at
http://www.xantech.com/Audio/AVDistribution/AVDistribution/MX88/ . Please see the “MX88 MRIP Quick
Start” document at the same URL for details.
ZONE RELATED WIRING CONNECTIONS
In typical applications, each zone will have at least one MX88 keypad or touch-panel, and a pair of
speakers. In zones with both audio and video (MX88vi), at least one video monitor or television will also be
used. In order to make these connections, the minimum requirement is home runs of one CAT5 cable for
each zone‟s keypad(s), two pairs of 12-18AWG wire for each pair of speakers, and one coaxial cable for a
TV or monitor (MX88vi) from each zone to the MX88 Controller/Amplifier location.
SPEAKER CONNECTIONS
1. Using good quality speaker wire, connect the individual speaker leads to the 4-terminal "SPEAKER"
connectors on the MX88 as shown in Figure 3 item 22.