


Page: 14 Model MX88
© 2011 Xantech Corporation
Section 2: Installation & Connections
INSTALLATION
Installing an MX88 system involves completely planning the system from hardware, installation, and
programming standpoint, before the actual installation begins.
We strongly recommend, before physical installation begins, that all the actual components to be used as part
of the MX88 system are physically connected and tested individually first, and then tested again as a system
with a fully programmed and configured MX88. This added effort can become a valuable investment in quick
and effective troubleshooting in case any issues are encountered after installation.
We also recommend that all installed wiring is checked thoroughly and systematically for continuity and
integrity, using proper test equipment designed for the specific type of wiring.
OPERATION: OUT-OF-THE-BOX PRE-TEST
The MX88 is shipped to operate basic functions „Out-Of-The-Box‟ without any programming. Simply by plugging
in keypads via standard CAT-5 RJ45 terminated patch cable and powering the controller „on‟, you can control
Source Selection, Volume Up/Down and speaker Mute capabilities.
Completing the Out-Of-The-Box Pre-Test will verify that all sources and zone components are working properly
to select and distribute audio and video prior to programming via QuickConfig or with the Universal Dragon.
This will ensure that the unit is indeed functioning correctly „prior‟ to fixed installation and allow proper
troubleshooting procedures if a problem is encountered. Instructions regarding full programming for specific
components and features will follow.
Notes:
- For Expanded, 16-zone configuration, test both units individually as outlined below.
- For simplicity of test set-up, only one Source Component, one pair of speakers, and one TV/Video
Monitor will be necessary.
For the pre-test the MX88, you will need the following:
8-RJ45 Terminated CAT5 cables. (Pre test cables prior to use – See Caution below)
1-Audio/Video Source Component (i.e. BluRay or DVD player, etc.) [Will be used to test ALL Source
Inputs]
1 Audio/Video RCA Harness (Capable of Audio Left/Right and Video)
1-Pair of speakers with Speaker Cable properly terminated into the included 4 conductor WECO-style plug
[Will be used to test Speaker outputs]
1-TV or Video Monitor [Will be used to test ALL Video Outputs – MX88 only]
8-283D Blink Emitter
All 8 MX88-compatible keypads or touch-screens
AC Cord
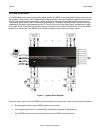
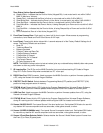
1. Connect MX88 Controller/Amplifier as shown in Figure 6 to:
a) All MX88 keypads via CAT5 Cables
c) Audio/Video Source to SOURCE 1 Audio Left/Right and Video Input terminals
d) TV or Monitor to Video Out 1 (MX88 Only).
e) Speakers to Speaker Output #1
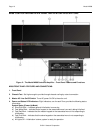
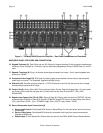
f) All 8 IR emitters to IR Emitter Ports 1 thru 8 (Figure 3, item 26)
g) AC Power for MX88 Controller and Audio/Video Source Component