


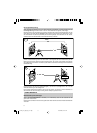


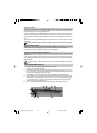
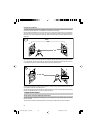

Now, place the unit near wall B with the plus-X-axis pointing towards wall B. After the unit is level, mark the
height of the laser spot at the centre of the beam at wall B. Turn the entire unit 180°, let it self-level and mark the
center of the laser spot at wall A. The difference (h) of the marked points at wall A shows the deviation.
If the unit is within its working accuracy limits (± 30"), the maximum difference from true level at 20 m (65 ft.) +
20 m (65 ft.) = 40 m (130 ft.) is 6 mm (1/4 inch). The highest and the lowest mark may be up to 12 mm (1/2 inch)
apart.
Repeat the above steps for "minus x" and for "plus-" and "minus y", so that a measurement for all four axes of
the unit have been performed.
If the visibility of the laser beam is bad, you can use a detector to transfer the heights to the walls. The accuracy
of the detector has to be regarded.
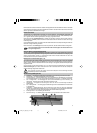
OPERATING EXAMPLES
Marking Heights
Put the instrument in horizontal mode (e.g. when using a tripod or wallmount) so that the laser beam is at the
desired height. Then either turn the prism manually to the desired area or use one of the rotation modes.
When working without a tripod or wallmount, put the instrument on a stable base and measure the height
difference between laser beam and desired height by using a ruler. After turning the prism to the desired area,
mark the measured height again.
2
2.2
1.1
h
A
B
2.1=1.2
A
B
20m
1
1.1
1.2
031266_02_apollo_eng_12-18.p65 29.08.2003, 10:29 Uhr15