


Line/scanning mode
By pressing and releasing the scan size button 2, the unit is set to scan mode. Rotation mode is stopped.
The unit starts at an opening angle of 8 degrees. Pressing the button again increases the angle to 45, 90 and
180 degrees.
By pressing and holding the scan size button 2 a programmable scan zone can be created by turning the
prism manually from the desired start-to the desired end-point. After releasing button 2, the created line will be
performed at actual speed.
By pressing the arrow buttons 4 and 5 the scan zone may be moved clockwise or counterclockwise. By
pressing and holding the buttons, the movement will be accelerated.
When pressing the buttons on the keypad, the unit may temporarily become out of level due to its
high accuracy.
Manual mode/Single Slope mode
By pressing the 'M' button on the remote control or the receiver-remote control, the unit is set from automatic
self-leveling mode to Manual mode. Manual mode is indicated by the flashing (once every second) red LED 7.
In Manual mode, the Y-axis can be sloped by pressing the Up- and Down-Arrow-buttons on the unit's keypad or
the remote control. Additionally, the X-axis can be sloped by pressing the Left- and Right-Arrow-buttons on the
remote control.
By pressing the 'M' button again in horizontal operation, the unit is set into Single Slope mode. This is indicated
by the flashing red 7 and green 6 LEDs (once every second). In vertical setup, pressing the 'M' button again
switches the unit back to automatic self leveling mode. In Single Slope mode, the Y-axis can be sloped by
pressing the Up- and Down-Arrow-buttons on the unit's keypad or the remote control, while the X-axis remains
in automatic self leveling mode (e.g. when setting up sloped ceilings or drive ways). Operates the unit in
Rotation at 600 rpm, the Height change (HI) alert is still active.
Self-leveling, Height change (HI) alert
Once turned on, the unit automatically levels itself in ranges of 8% (± 0,8 m / 10 m; 8 ft/100ft)). In order to
recognize the leveling process at the measuring area and in order not to mark faulty heights during this operation,
the rotation stops.
Once leveled, the unit constantly monitors its level condition. The Height change (HI) alert is activated 5
minutes after self-leveling was performed and the laser is rotating at 600 min
-1
.
Level errors > 30 mm/10 m (1-1/8inch/10ft) put the unit into alert mode because they are generally caused by
a disturbance which could lead to inaccurate measurements. When entering into alert mode, the prism stops,
the beam turns off, a warning sound is heard and the HI Warning LED 7 flashes 2x per second. Turn the unit off
and then on again. To assure your former elevation, now you have to check or arrange the exact height.
LEVELING ACCURACY
Influences on the leveling accuracy
The overall accuracy of the unit can be influenced by many factors:
• factory accuracy;
• temperature of the unit;
• ambient influences like rain, wind and temperature.
The factor which influences on the unit's accuracy most is the ambient temperature. Vertical differences in
temperature near the ground can divert the laser beam, similar to the heat waves seen on hot asphalt streets.
This factor also applies to all optical measuring devices such as automatic levels and theodolites.
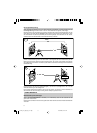
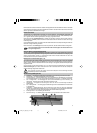
Accuracy Check
To ensure job-site accuracy, you need a distance of 20 m (65 feet) between two walls A and B, where you will
execute 4 measuring operations on a tripod as follows (transit measurement).
Set the unit horizontally on a tripod near wall A and switch it on with the plus-X-axis pointing towards wall A. After
the unit is level, mark the height of the laser spot at the centre of the beam at wall A. Turn the entire unit 180°,
let it self-level and mark the center of the laser spot at wall B.
031266_02_apollo_eng_12-18.p65 29.08.2003, 10:29 Uhr14