


13
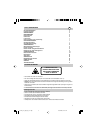
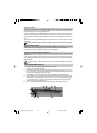
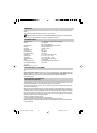
COMPONENTS
Buttons
1 Power button
2 Scan size button
3 Speed and Rotation button
4 Down arrow button
5 Up arrow button
Control indicators
6 Leveling Indicator
7 Manual/Warning Indicator
8 Battery Indicator
9 Infrared-receiver for remote control
Elements of the unit
10 Beam aperture/prism cap
11 Elastic rubber boot
12 Handle
13 Center Marks
14 Battery door
15 5/8x 11 Tripod Mounts
16 Rubber feet
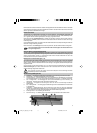
SETTING TO WORK
Before using the unit for the first time, install alkaline or rechargeable batteries. Charge rechargeable batteries.
See battery section.
Position the unit horizontally or vertically (tripod mount and rubberfeet downward!) on a stable platform, wallmount
or tripod at the desired elevation. The unit recognizes automatically whether it is used horizontally or vertically
when switched on.
Press the power button 1 to turn on the unit. Self-leveling will start at once. In order to switch the unit off, press
the power button again. The unit is leveled when the leveling indicator 6 is no longer flashing (once every
second). The rotor will not spin until the unit is leveled. For the first five minutes after the laser self levels, the
LED lights solid then flashes every four seconds to let you know the laser is still level.
After turning on the unit and after self-leveling, the unit starts with the last chosen mode. Using "set and forget"
during self-leveling after turning on the unit, the scan size and position, and rotation speed can be chosen while
the laser beam will be emitted.
If the unit is positioned beyond it´s self-leveling range of ±8%, the laser and leveling indicators will recurringly
flash quickly four times. Turn the unit off, reposition the laser within the self-leveling range and turn it on again.
Rotation mode
By pressing the speed/rotation button 3 the unit is set into rotation mode. Line mode is stopped.
Pressing the button again, rotation speed will toggle through 600, 200, 80, 10 and 0 min
-1
. At 10 rpm a small
laser line will increase visibility of the rotating beam.
When pressing the buttons on the keypad, the unit may temporarily become out of level due to its
high accuracy. The motor will not rotate until it has self-leveled again.
Select the highest rotation speed (600 rpm) for use with an electronic detector.
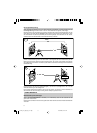
Pointing mode
When using the pointing mode, the laser visibility will be at its highest because the entire laser energy is
focused on one point. Turn the prism by hand or press the arrow buttons 4 and 5 on the keypad to the desired
position.
During horizontal operation, by pressing the arrow buttons, the prism is moved gradually counterclockwise
or clockwise (360°).
During vertical operation, the laser point may be positioned precisely or may be adjusted parallel right- or
leftwards on a ± 8% range.
By pressing and holding the buttons, the movement of the point will be accelerated.
031266_02_apollo_eng_12-18.p65 29.08.2003, 10:29 Uhr13