


4 – Recording—Basic recording
TASCAM CD-RW2000
19
4.2 Basic recording
NOTE
According to the “Red Book” (the specification for
audio CDs), a track cannot be less than four seconds
in length, and there can be a maximum of 99 tracks
on an audio CD. Bear these limitations in mind when
recording.
If you press either the
STOP
or the
PAUSE
key within four
seconds of starting recording, the unit will continue record-
ing until four seconds have elapsed (since the start of
recording) and then stop or pause as appropriate.
After selecting the input source (4.1, “Input selec-
tion”), it is possible to start recording.
The basic record procedure is as follows:
1
Load a recordable disc is into the unit. As the
disc is loaded, the display shows
TOC
Reading
.
When the disc has been loaded, the display
indicators show
CD-R
,
NO TOC
, or
CD-RW
,
NO TOC
,
as appropriate.
2
Press the
RECORD
key (
J
or
D
). The unit
enters record ready mode, as shown by the
REC
and pause indicators on the display. As the unit
enters record ready mode, the display shows
Now OPC
(Optimum Power Control), as
the unit prepares to record on the disc.
If the digital source selected (see 4.1, “Input
selection”) is not connected properly, or is not
powered up, the message
D-IN
UNLOCK!
(digital input is unlocked) will be
displayed to show that the system is not ready
to record.
3
Adjust the level of the source, following the
guidelines in 4.1.1, “Signal volume”.
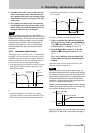
NOTE
The red
OVER
indicators on the meters should never
light. Unlike analog equipment, digital audio units
produce extremely unpleasant sounds when dis-
torted, and there is no “headroom” after the
0
mark. If
recording digitally from a commercially-produced CD,
the volume set in the menu should be 0dB. This will
maintain all the dynamic range of the source CD
without clipping. Only boost the signal if the source is
exceptionally quiet.
An analog signal input at nominal level, with no cut
or boost from the volume controls, is equivalent to a
reading of –16 dB on the meters (on other words, 0 is
equivalent to 16 dBFS).
4
Press the
PLAY
key (
H
or
L
) to start
recording.
Note that there is no need to “cue up” the
recording position—the unit always finds the
next available location on the disc and start
recording to it.
5
Press the
PAUSE
key (
I
or
J
) to pause
recording temporarily. The pause indicator on
the display shows this.
Pressing
PLAY
again restarts recording with a
new track number.
6
Press
STOP
(
G
or
I
) to stop recording. When
recording stops, the display shows
PMA
Writing
(Program Memory Area) and
the
REC
indicator flashes for a few seconds as
the unit writes to the disc.
NOTE
While the “PMA Writing” message is displayed, all
keys are disabled, and the unit is actually writing to
disc. Do not disconnect the power or subject the unit
to severe vibration or shocks at this time, as this will
prevent proper recording of the information.
When this message disappears, you must press
the
RECORD
key (step
2
) before restarting the
recording. Recording restarts with a new track
number.
NOTE
Remember that every time recording is paused or
stopped, when recording is restarted, a new track will
always be started. It is not possible to record in two
“stages” within one track.
4.2.1 Playing back tracks
Although an unfinalized disc cannot be played back
on an ordinary CD player, the CD-RW2000 can play
back tracks that have been recorded.
Use the
MULTI DIAL
control
B
or the
SKIP
keys
H
to select a track for playback.
4.2.2 Time display while recording
While a recordable disc is being played back, the
four time display modes available in normal play-
back as described in 3.1.1, “Time display modes”:
TOTAL
,
TOTAL REMAIN
, track
REMAIN
and elapsed track
time.
However, during recording there are fewer options
available (obviously, the unit cannot see into the
future and know how much time remains of the track
which is being currently recorded!).