


11
Getting Started
Getting Started
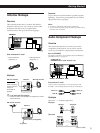
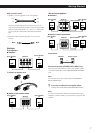
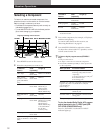
DAT or MD deck
Receiver DAT or MD deck
Xç
Ç
DIGITAL
LD / DVD IN
LD / DVD IN
AC-3
RF
OPTICAL
OUT IN
CD IN
OPTICAL
DAT / MD IN
OPTICAL
DAT / MD OUT
OPTICAL
DIGITAL
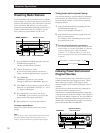
Warning regarding the playback of DAT/MD sources
When playing DAT/MD sources through the receiver,
do not play a DAT/MD that contains digital recordings
made from a DVD player whose digital output was set
to “DOLBY DIGITAL.” High volume will be output
which may damage the receiver and your speakers.
Notes
• You cannot connect a LD or DVD player through digital
connection when the LD/DVD IN OPTICAL jack is
already used. In this case, connect the LD or DVD player
to the LD/DVD jacks.
• This receiver is compatible only with digital components
using 32, 44.1, or 48-kHz sampling frequencies and not
compatible with 96 kHz.
• Be sure to connect digital components (CD player, DAT/
MD deck, etc.) to the analog jacks as well as the digital
jacks in order to do analog recording.
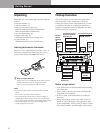
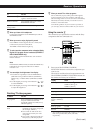
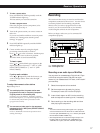
AC Hookups
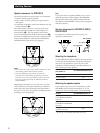
Setting the voltage selector (only on the
models supplied with the voltage selector)
Check that the voltage selector on the rear panel of the
receiver is set to the local power supply voltage. If
not, set the selector to the correct position using a
screwdriver before connecting the AC power cord to a
wall outlet.
220V
240V
120V
VOLTAGE SELECT
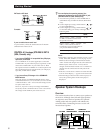
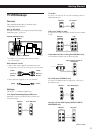
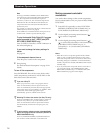
Connecting the AC power cord
Connect the AC power cord from this receiver and
from your audio/video components to a wall outlet.
If you connect other audio components to AC OUTLET
on the receiver, the receiver can supply power to the
connected component(s) so you can turn on/off whole
system when you turn on/off the receiver. Note that
only one switched AC outlet is supplied with the
Australian STR-DE915/DE715.
MONITOR
VIDEO
OUT
CTRL S
IN
VIDEO
IN
VIDEO
OUT
VIDEO
IN
CTRL S
OUT
VIDEO
OUT
CTRL S
OUT
VIDEO
IN
VIDEO
IN
IN
L
R
REC OUT
IN
REC OUT
ININ
CTRL S
STATUS
IN
SIGNAL
GND
FM
75Ω
COAXIAL
AM
AUDIO
IN
L
R
AUDIO
OUT
AUDIO
IN
AUDIO
OUT
AUDIO
IN
CTRL A1
y
y
PHONO
ANTENNA CD DAT / MD TAPE
MONITOR
VIDEO 1
VIDEO 2LD/DVDS-LINK
S-LINK
AUDIO
IN
TV/DBS
AC OUTLET
4 Ω 8 Ω
FRONT SPEAKERS
SURROUND SPEAKERS
WOOFER
AUDIO
OUT
IMPEDANCE
SELECTOR
FRONT
WIRELESS
REAR
SPEAKER
AC OUTLET
b
to a wall
outlet
Caution
Make sure that the total power consumption of the
component(s) connected to receiver’s AC OUTLET does not
exceed the wattage stated on the rear panel. Do not connect
high-wattage electrical home appliances such as electric
irons, fans, or TVs to this outlet.
Before You Use Your Receiver
Before you start using your receiver, make sure that
you have:
• Turned MASTER VOLUME to the leftmost position
(0).
• Selected the appropriate speaker system. (For
details, see “Selecting the speaker system” on
page 8.)
• Set BALANCE to the center position.
Turn on the receiver and check the following indicator.
• Press MUTING on the remote if “MUTING” appears
in the display.
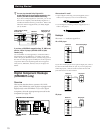
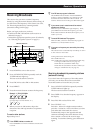
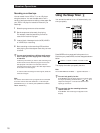
Clearing the receiver’s memory
Before you use your receiver for the first time or
when you want to clear the receiver’s memory, do
the procedure below.
SHIFT
INPUT
MODE
DIRECT
0
5
9
4
8
3
7
2
6
1
VIDEO FUNCTION AUDIO FUNCTION
GENRE
MEMORY
PRESET
TUNING
TUNING
TONE
SUR INDEX
+
DISPLAY
–
FM / AM
+
FM MODE
–
SET UP
DIRECT
PASS
MODE
DIRECT PASS
SOUND FIELD
ON / OFF
BASS
BOOST
BALANCE
LR
DISCRETE
5
0
1
3
9
7
4
6
2
8
1
0
•
•
•
•
•
•
•
•
•
•
•
•
•
•
•
•
•
•
•
•
•
•
•
•
•
•
•
•
•
•
•
PHONES
POWER
SPEAKERS
DPC
MODE
A
OFF
A
+B
B
g
MASTER VOLUME
VIDEO 2VIDEO 1 VIDEO 3 LD / DVD TV/DBS TAPE DAT / MD CD TUNER PHONO
RLVIDEO AUDIO
VIDEO 3 INPUT
MODE
POWER
AUDIO FUNCTION
VIDEO FUNCTION
1 Turn off the receiver.
2 Press down VIDEO FUNCTION , AUDIO
FUNCTION , MODE, and POWER
simultaneously.
The contents of the memory (preset station
and other parameter settings) are erased.