


Editing Recorded MDs
26
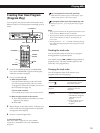
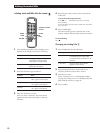
Labeling tracks and MDs with the remote
4 Repeat Steps 2 and 3 until you have entered the
entire title.
If you entered the wrong character
Press 0 or ) until the character to be corrected
starts flashing.
Press CLEAR to erase the incorrect character, then enter
the correct one.
5 Press NAME again.
The entered title appears on the left side of the
display window after the label has been recorded.
To cancel labeling
Press p.
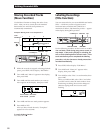
Changing an existing title Z
1 Press NAME, then do the following:
2 Keep pressing CLEAR (or EDIT/NO on the
recorder) until the current title is erased.
3 Enter the new title.
Carry out Steps 4 to 7 of “Labeling Recordings”
on page 24, or Steps 2 to 4 of “Labeling tracks and
MDs with the remote” on page 26.
4 Press NAME.
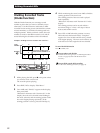
1 Press NAME repeatedly until a flashing cursor
appears in the display, then do the following:
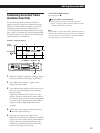
To select
To label
Make sure that the recorder is
A track
Playing, pausing, recording the track
to be labeled, or stopped after
locating the track to be labeled
An MD Stopped with no track number
appearing in the display
2 Select the character type as follows:
Press
Uppercase letters CHAR repeatedly until “Selected
ABC” appears in the display
Lowercase letters CHAR repeatedly until “Selected
abc” appears in the display
NUM repeatedly until “Selected
123” appears in the display
Numbers
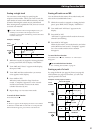
3 Enter one character at a time.
After you enter a character, the cursor shifts
rightward and waits for the input of the next
character.
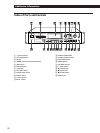
Alphabet/number
buttons
r
6
)0
+=
pP·
NAME
CHAR
CLEAR
NUM
p
0/)
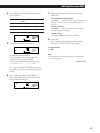
To change
A track title
Make sure that the recorder is
Playing, pausing the track whose title
is to be changed, or stopped after
locating the track whose title is to be
changed
Stopped with no track number
appearing in the display
A disc name