


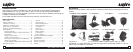
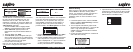

Sanyo CRSR-10 User Guide Sanyo CRSR-10 User Guide
Cleaning the Unit
If the unit becomes dirty, turn its power off and
wipe it clean with a soft dry cloth. Do not use hard
cloths or paint thinner, alcohol, or other volatile
solvents to clean the unit. These may cause
damage or remove indicator characters.
Warning
Do not operate the unit in a way that might divert
your attention from driving safely. As a driver, you
alone are responsible for safely operating your
vehicle in accordance with traffic safety laws at all
times.
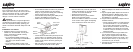
Installation in a Vehicle
6 7
• Do not install the CRSR-10 where it may hinder the
function of safety devices such as an airbag.
Doing so may prevent the airbag from functioning
properly in the event of an accident.
• Find a location that provides good visibility of and
access to the CRSR-10’s front panel.
• Make sure the windshield is clean and dry.
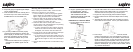
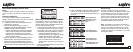
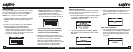
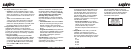
3. Attach the Adaptor to the CRSR-10 as shown left
below.
4. Plug the cigarette lighter adapter into the back of
the Adaptor where it is labeled “Power”. Don’t
plug the adapter into the cigarette lighter until
the installation is completed.
5. Plug the antenna cable into the Adaptor where it
is labeled “Antenna”.
• Find an antenna location on a metal surface of
your vehicle at least 12" x 12", and at least 6"
from a window. Best reception is achieved
with the antenna mounted on the roof or trunk
for convertibles. If the vehicle has a roof rack
or skid ribs, it may be necessary to mount the
antenna off center.
6. If you would like to hard-wire your CRSR-10 to
your car stereo that has an aux input (RCA
jacks), plug the supplied audio cable into the
back of the Adaptor where it says “Audio”. Plug
the audio cable’s white (L ch,) and red (R ch.)
connectors into your car stereo.
7. The antenna’s powerful magnet will secure it to
the metal surface.
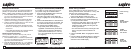
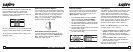
• With the knobs loose, move the yoke into a
position that will allow you to see the CRSR-
10 screen and access the buttons.
• Tighten the knobs securely.
• Now that the mount is in place, slide the
CRSR-10 into the button holder.
Note: if the CRSR-10 rotates too much while
on the suction mount, tighten the adjusting
screw located in the center of the mount.
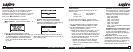
1. Determine where you want to mount the
CRSR-10 on the windshield. You may also
want to inquire about optional mounting
methods at your dealer.
• Do not install the CRSR-10 where it may
obstruct your view through the windshield or
your view of your vehicle’s indicator
displays.
• Do not install the CRSR-10 where it will
hinder your access to the vehicle’s controls.
4
6
5
3
Button
Holder
Knobs
Cam Lever
in locked
position
Adjusting
Screw
Yoke
Press
Button
• Loosen both knobs and lift the yoke away from the
“Press” button in an orientation similar to above.
• Place the cam in the down position and push the
window mount onto the window by pressing the
“Press” button.
• With your finger on the “Press” button, pull up on
the cam lever to secure the mount in place.