


MOON Stargate Processor
System Setup
The most effective way to setup the Stargate for the first time is to go through each step. It may
seem time consuming, but you will be rewarded with very high quality audio reproduction and ease of
use after you have completed the entire process. Normally, this is done only once; You won’t have to
perform another “System Setup” unless you make a change to your system. Future changes to the
“System Setup” will be much simpler since you may go directly into the section(s) you need to change.
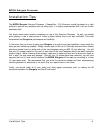
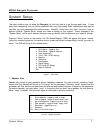
Press the “Menu” button on the remote, the “On Screen Display” (OSD) will appear like figure 1 below.
Using the numeric keypad on the remote control, press the button corresponding to what you want to
setup. The OSD will jump to the related menu.
1.
2.
3.
4.
5.
6.
7.
8.
9.
Figure 1: Main Menu
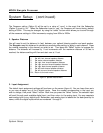
1. Speaker Size
Speaker size refers to your speaker’s actual frequency response. For each channel, choosing “large”
means that the channel will be set to “full-range” by the processor; Choosing “small” means that the
processor will filter out the low bass from this channel and redirect this part of signal to the subwoofer.
For some channels, you may select “none” in the event that you don’t use a speaker for that channel.
When “none” is chosen, this channel’s signal is redirected to another channel(s).
Figure 2: Speaker Size Menu
____________________________________________________________________________________
System Setup 7
1. Quick Setup – Speaker size
2. Quick Setup – Speaker distance
3. Input assignment
4. Tuner / PAL / NTSC Settings
5. Bass trim
6. Calibration
7. Compression
8. Status Display
9. DVD Audio Full Range
0. Reset to Defaults
Exit
1. Front speakers - toggle to small or large
2. Center speaker - toggle to small, large, none
3. Surround speakers - toggle to small or large
4. Rear speakers - toggle to small, large, none
5. Subwoofer - toggle yes or no
6. Crossover
Exit Return to the main menu